3D Printing-Repetier Set-up
Here is the hosting software and my set-up I use with my MakerSelect printer. I find it easier to get good results and it is a little more intuitive.
http://www.repetier.com/download-software/
Contents
Printer Set-up
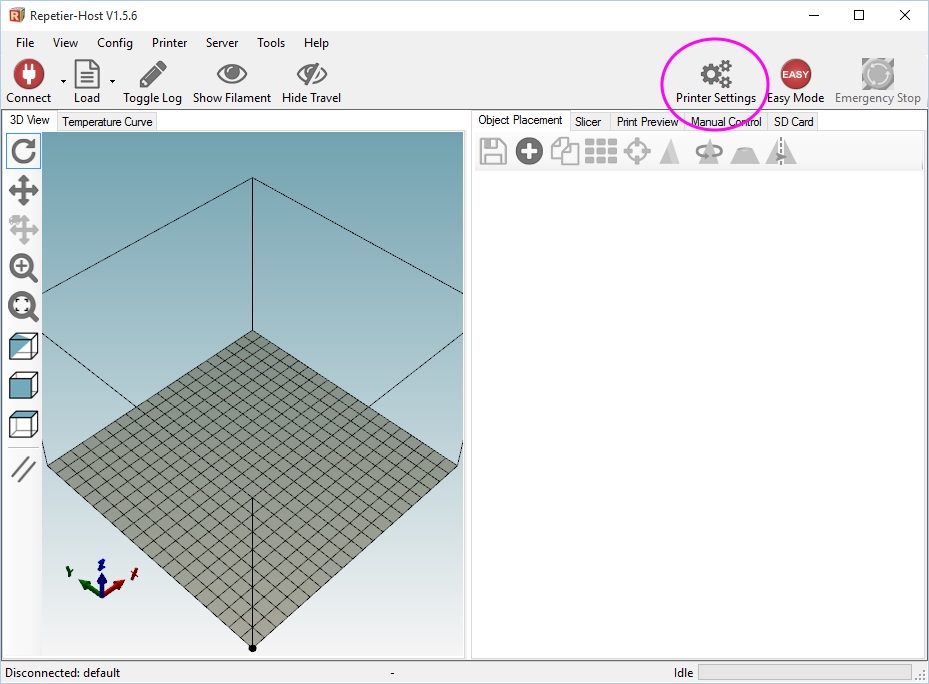
After downloading and installing the software, open the "Repetier Host" app and select "Printer settings"
Printer settings has 6 tabs.
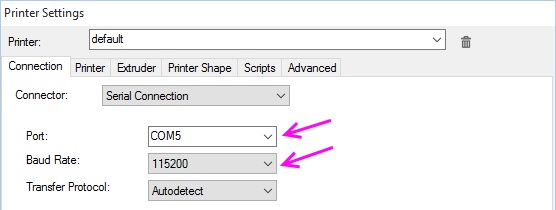
On the "Connection" tab, change the Port to the port which activates when you plug the usb cable from your printer into your computer (you can see this in "Device Manager"). Also, in Device Manager, open the port properties, settings and check that the port speed is set to 115200 bits per second. Click "Apply"
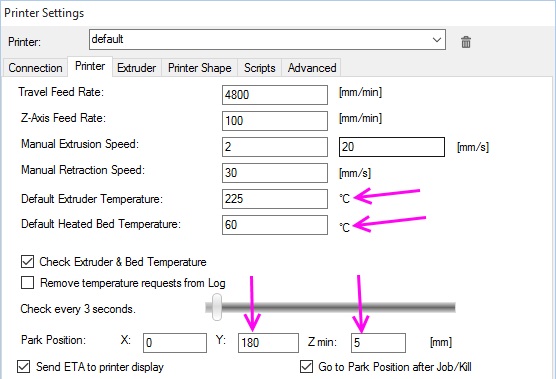
On the "Printer Tab" set the default Extruder Temperature to 225C, the bed temperature to 60C and the park positions to 0, 180, 5, as shown. Click "Apply"
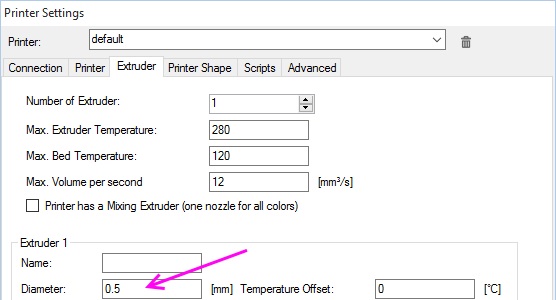
On the Extruder tab, make sure the extruder diameter is set correctly for your machine. Click "Apply"
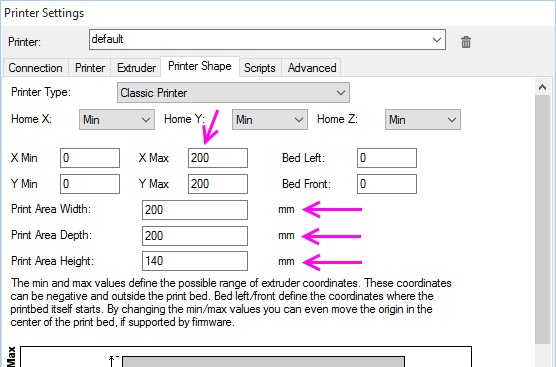
On the "Printer Shape" tab, set the work area maximums and size. Click "Apply"
Click "OK"
Before moving on, turn on the printer and select "Connect" 
Make sure the printer connects and the "connect" button changes to a green "Disconnect"  Now click Disconnect and turn the printer off.
Slicer Set-up
This is where the magic happens. Here I will give you what has worked for me but your settings will eventually vary depending on the material you use, the brand of that material and your own personal preferences. I prefer PLA so this is what will be shown here. ABS is also a good material but it is smelly when it prints, it is hard to get it to bond to the work platform and the finish isn't as good (IMHO).
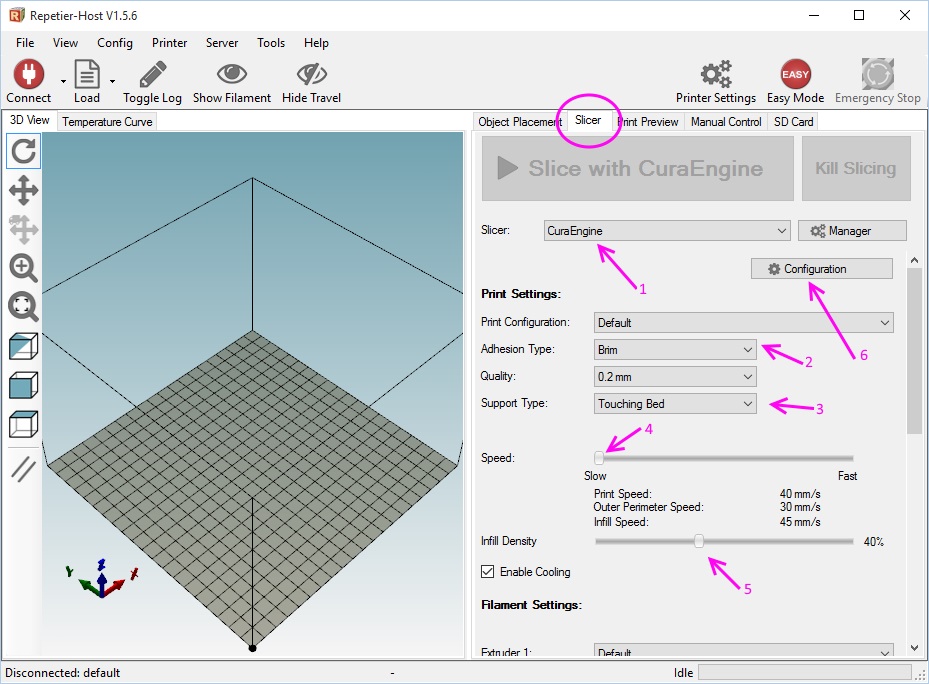
Open the "Slicer" tab
- 1. In the "Slicer" drop down box, select "CuraEngine".
- 2. In "adhesion Type" select "Brim"
- 3. In "Support Type" select "Touching Bed"
- 4. Set "Speed" to "Slow"
- 5. Set "Infill Density" to "25%"
Notes:
- There are other slicers listed but this one works best for me on PLA.
- Brim will add a few strands outside and inside the first layer to help stick your print to the work platform. It simply snaps off when the print is done.
- Touching bed will add support if you are printing an overhang.
- Speed - Slow is a good place to start and better for small prints.
- Density typically will be between 15% and 45% depending on how much strength or warp resistance you need.
Now click #6, "Configuration"
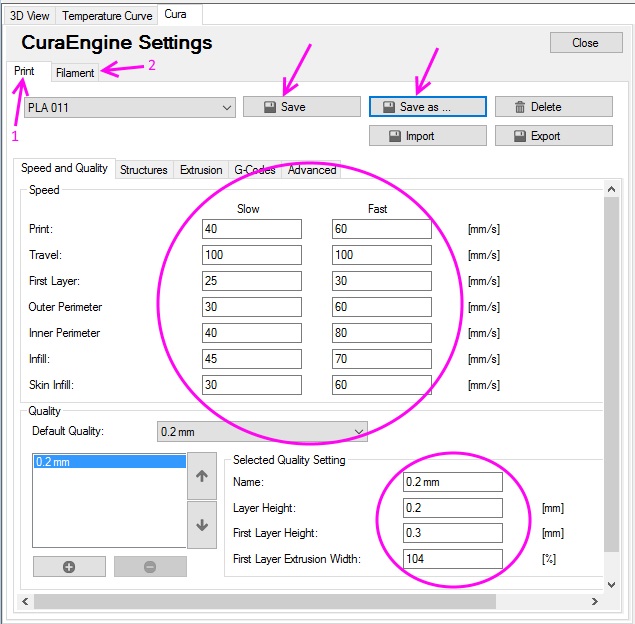
On the 1. "Print" tab, click "Save as ..." and type in a name for your first set of settings (mine is "PLA011").
Copy the settings shown and click "Save"
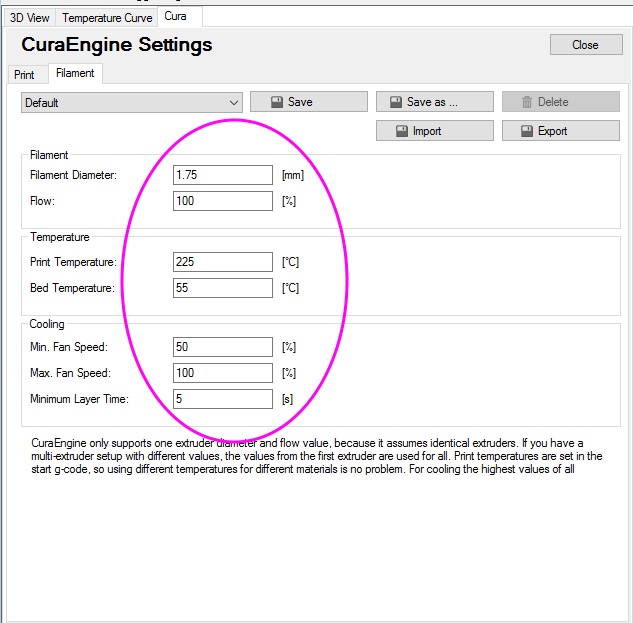
Now click the 2. "Filament" tab.
Copy these settings, click "Save" then go back to the "Print" tab and select "Structures".
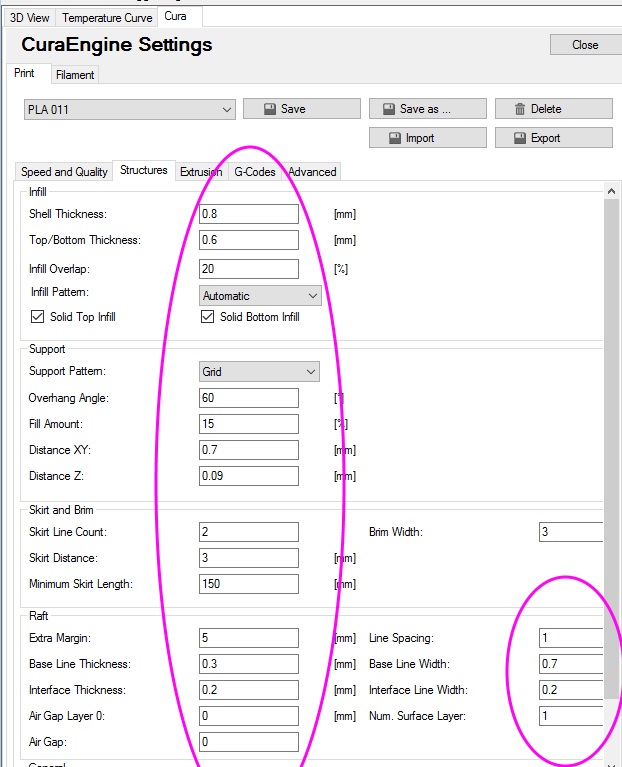
Make sure your settings match those shown, click "Save" the select "G-Codes.
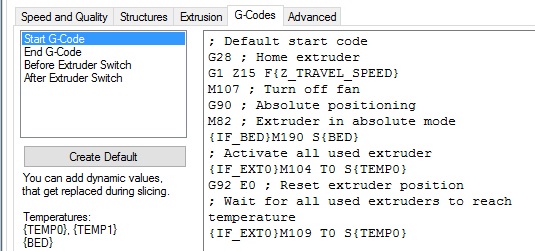
With "Start G-Code open, copy and paste this into the window:
; Default start code
G28 ; Home extruder
G1 Z15 F{Z_TRAVEL_SPEED}
M107 ; Turn off fan
G90 ; Absolute positioning
M82 ; Extruder in absolute mode
{IF_BED}M190 S{BED}
; Activate all used extruder
{IF_EXT0}M104 T0 S{TEMP0}
G92 E0 ; Reset extruder position
; Wait for all used extruders to reach temperature
{IF_EXT0}M109 T0 S{TEMP0}
Click "Save" and select "End G-Code" and copy and paste the following:
; Default end code
;G1 X0 Y0 Z130 ; Get extruder out of way. Uncomment to use!
M107 ; Turn off fan
; Disable all extruder
G91 ; Relative positioning
{IF_EXT0}T0
{IF_EXT0}G1 E-1 ; Reduce filament pressure
M104 T0 S0
G90 ; Absolute positioning
G92 E0 ; Reset extruder position
M140 S0 ; Disable heated bed
M84 ; Turn steppers off
Work Platform Prep
Before printing, you MUST do the following to prepare the work platform.
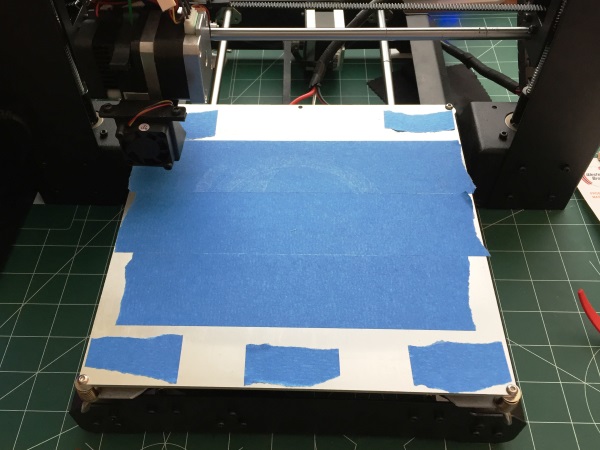
Cover the platform center and each corner with blue painters tape as the basis for platform leveling and print adhesion. Clean the tape with a little Windex or other spray cleaner. You can also use denatured alcohol but this sometimes makes it very difficult to remove the print.
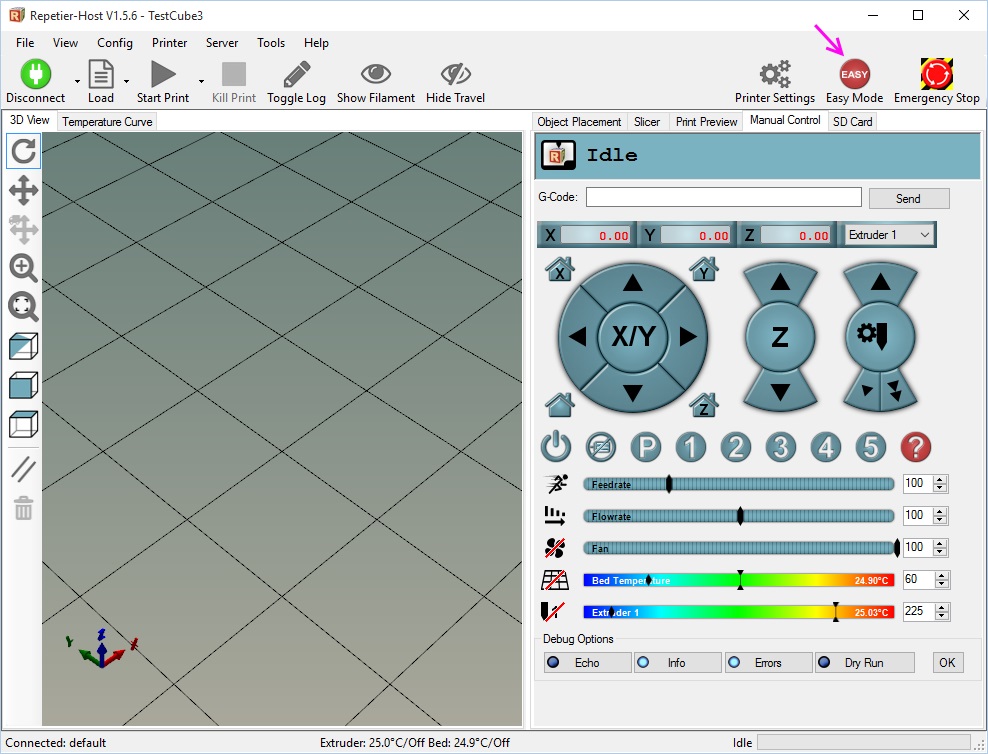
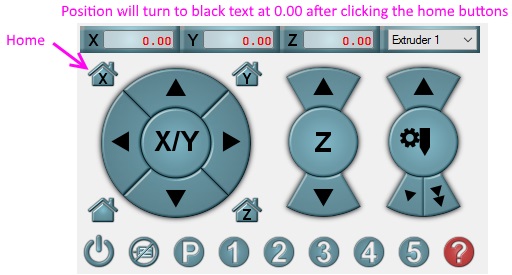
Turn the printer on, select "Connect"  and click on the "Manual Control" tab.If the "Easy Mode" button is green, click it so it turns red. Your screen should look like the one below.
One at a time, click the "Home" buttons to get the print head to position 0,0,0. Disconnect and turn the printer off.
Now, move the print head by gently pushing on the platform (fore and aft) and/or the print head (left and right) to each corner over a piece of blue tape. Using the four adjust screws on the corners of the platform, adjust the screws so that a piece of standard paper (~.08mm) just slides between the nozzle and the taped corner. Keep repeating this until you get consistent results in all four corners. Now check the center in two or three places. If the center is too tight, loosen the four corners an equal amount until you get the proper measurement.
You are now ready to load a file and print!
Loading and Printing
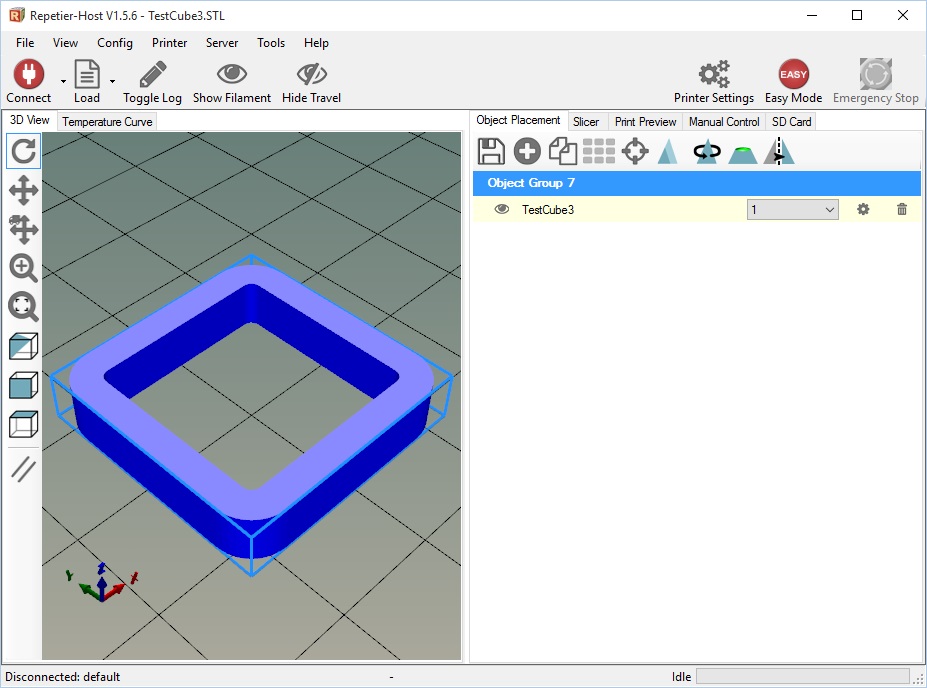
Turn the printer on, select "Connect"  and click on the "Object Placement" tab then click on "Load".
Find the STL file you want to print and click "Open".
You can play around with the view (left) and placement (right) tools to see the effects. Every print has a side that must be down on the work platform and this is where you do this.
Now select the "Slicer" tab again.
Confirm "CuraEngine" is selected and click on "Slice with CuraEngine"
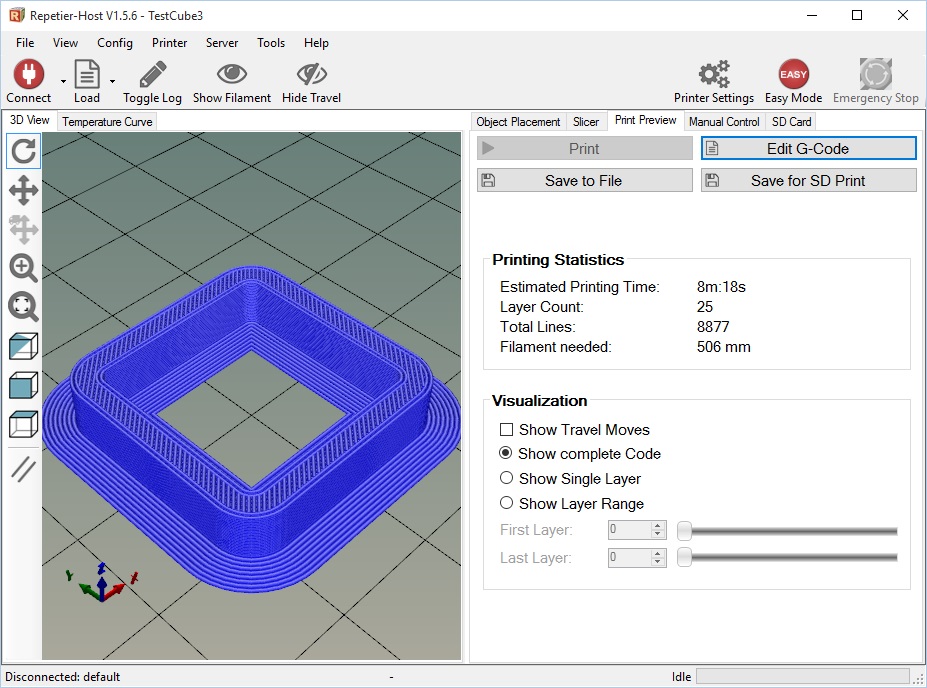
The app will switch to the "Print Preview tab when finished slicing and present the print statistics as well as a tool to see the layers individually.
Wait for it...
Change to the "Manual Control" tab and again click on the three "Home" buttons (X,Y,Z).
Click on the two heater buttons to start heating the Nozzle and Platform and...wait.
When the two tempurature pointers meet up with the pre-determined settings select "Start Print" 
Watch the magic happen :)
