Difference between revisions of "Geared Aerodynamic Pan and Tilt"
(→Tilt Configurations) |
(→Where to buy the parts) |
||
| (56 intermediate revisions by the same user not shown) | |||
| Line 1: | Line 1: | ||
[[File:BTI.png|link=GIMBALS|Gimbals]]<br> | [[File:BTI.png|link=GIMBALS|Gimbals]]<br> | ||
| − | <i>February 2018</i><br> | + | <i><small>© Mark Qvale - February, 2018</small></i><br> |
<br> | <br> | ||
{| cellspacing="1" cellpadding="1" width="95%" border="0" | {| cellspacing="1" cellpadding="1" width="95%" border="0" | ||
| Line 13: | Line 13: | ||
== Introduction == | == Introduction == | ||
| + | <br> | ||
| + | ---- | ||
| + | : '''NOTE - 24 March, 2018 - NOTE: It was pointed out to me by poster Mochanic on RCG that I had the wrong 26 tooth drive gear listed in the parts section which has now been corrected to the correct 32 tooth drive gear. Apologies for the inconvenience!''' | ||
| + | ---- | ||
| + | <br> | ||
| − | Having designed and released a pile of different Pan and Tilt units I decided to try and make | + | Having designed and released a pile of different Pan and Tilt units I decided to try and make something a little different. I came up with a list of simple design goals that were based on requests and experiences with other PnT's. The list then, in (my) order of importance is: |
<br> | <br> | ||
| − | :* Lighter and Faster than my HD Pan and tilt | + | :* Lighter and Faster than my HD Pan and tilt which is around 100g |
| − | ::- New weight is 80g with the | + | ::- New weight is ~80g with the components shown here |
:* Is smooth and precise with excellent centering | :* Is smooth and precise with excellent centering | ||
| − | ::- With a new programmable digital Hitec HS-5245MG servo, it is extremely smooth and centers beautifully | + | ::- With a new, fully programmable digital Hitec HS-5245MG servo, it is extremely smooth and centers beautifully |
:* Is more aerodynamic | :* Is more aerodynamic | ||
::- Now with both servos mounted below the deck, it is very aerodynamic | ::- Now with both servos mounted below the deck, it is very aerodynamic | ||
| Line 30: | Line 35: | ||
::- Tilts down 42° (see text) | ::- Tilts down 42° (see text) | ||
<br><br> | <br><br> | ||
| + | |||
| + | As you can see I came pretty close to hitting most of these goals. For the two I missed a little:<br> | ||
| + | |||
| + | :'''-''' The one component which could not easily be made from off the shelf parts is the aluminum gear shaft which I turned in a mini lathe. There is more information on this in the build section. | ||
| + | :'''-''' The tilt-down spec can and will likely change. The cost for increasing tilt-down is the assembly gets taller, a little harder to make smooth and slightly less aerodynamic. I was happy with 42° as this is more than enough for the planes I plane to use it on.<br><br> | ||
---- | ---- | ||
'''NOTE''' | '''NOTE''' | ||
| − | Apologies to all followers in Europe and Australia! The components selected started with a new (awesome) drive gear from ServoCity.com which I know can be very hard to find outside the US. | + | Apologies to all followers in Europe and Australia! The components selected started with a new (awesome) drive gear from <u>[http://www.servocity.com ServoCity.com]</u> which I know can be very hard to find outside the US. This new drive gear comes with the Hitec C1 spline already molded in which made the design and subsequent build <u>much</u> easier. Of course this also means the gear shaft and bearings are also imperial dimensions. |
---- | ---- | ||
<br> | <br> | ||
| Line 48: | Line 58: | ||
=== Configurations === | === Configurations === | ||
| − | For this project I decided to keep it simple so there is only one pan-only setup and one tilt setup.<br><br> | + | For this project I decided to keep it simple so there is only one pan-only setup and one tilt setup. I will likely add a custom [[RunCam Split Pan and Tilt and Cases | RunCam Split deck]] like I have done on my Offset Pan and Tilt in the future.<br><br> |
{| border="0" cellspacing="1" cellpadding="1" width="95%" align="center" | {| border="0" cellspacing="1" cellpadding="1" width="95%" align="center" | ||
|- | |- | ||
| − | | align="center" | [[File:GAP13.JPG| | + | | align="center" | [[File:GAP13.JPG|700px]] |
|- | |- | ||
| − | | align="center" | | + | | align="center" | Pan-only and Tilt decks |
|} | |} | ||
<br><br> | <br><br> | ||
| + | == The Build == | ||
| − | + | On any project such as this, understanding the work scope and finding the resources needed is a key to success. For the full tilt version there are 6 3D print parts that require some detail work and one aluminum gear shaft that will require some machining.<br><br> | |
| − | + | ||
| − | + | ||
| − | <br> | + | |
=== Parts and Specifications === | === Parts and Specifications === | ||
| + | |||
| + | The parts shown here are what was used on the unit when released. This list can change over time as I look for ways to improve it.<br><br> | ||
'''Print Parts'''<br> | '''Print Parts'''<br> | ||
| − | :* Base Plate | + | :* 52161 Base Plate |
| − | :* Bearing Support Plate | + | :* 52162 Bearing Support Plate |
| − | :* Tilt Servo | + | :* 52163 Mount Bracket, Tilt Servo |
| − | :* | + | :* 52164 Turret Mount |
| − | :* | + | :* 52165 Camera Deck |
| − | :* | + | :* 52166 Slide Covers |
| − | :* Pan Deck | + | :* 52167 Pan Deck |
| + | :Printable STL files are at the bottom of this page<br> | ||
'''Off the Shelf Parts'''<br> | '''Off the Shelf Parts'''<br> | ||
| Line 80: | Line 91: | ||
:* 1x Dubro #172 2-56 Threaded Rod | :* 1x Dubro #172 2-56 Threaded Rod | ||
:* 1x Pushrod Linkage Stopper D2.1mm | :* 1x Pushrod Linkage Stopper D2.1mm | ||
| − | :* 1x ServoCity #RSA32-2HS- | + | :* 1x ServoCity #RSA32-2HS-32 32 pitch/32 tooth Acetyl Servo Gear - C1 Spline |
:* 1x ServoCity #SPBD32-34-16 32 pitch/16 tooth Acetyl Plain Bore Gear | :* 1x ServoCity #SPBD32-34-16 32 pitch/16 tooth Acetyl Plain Bore Gear | ||
| − | :* 2x ServoCity #535018 .250"ID x .375"OD x .125"L Non-Flanged Ball Bearing w/Dual Shield | + | :* 2x ServoCity #535018 .250"ID x .375"OD x .125"L Non-Flanged Ball Bearing w/Dual Shield<br> |
| − | + | ||
| − | + | ||
| − | + | ||
| − | + | ||
| − | + | ||
| − | + | ||
| − | + | ||
| − | + | ||
| − | + | ||
| − | + | ||
| − | + | ||
| − | + | ||
| − | + | ||
'''Servos'''<br> | '''Servos'''<br> | ||
| − | :* Pan - Hitec HS-5245MG digital programmable Mini Servo ( | + | :* Pan - Hitec HS-5245MG digital programmable Mini Servo (32g) |
| − | :* Tilt - Corona DS929MG digital micro servo | + | ::* Also needed - Hitec HPP-21 PC Digital Servo Programmer |
| − | :: '''NOTE:''' This project was designed specifically around the two servos shown | + | :* Tilt - Corona DS929MG digital micro servo (14.1g) |
| − | + | :: '''NOTE:''' This project was designed specifically around the two servos shown<br> | |
| − | + | '''Fasteners'''<br> | |
| − | :Total weight with all hardware shown - | + | :* 4x M2.5x6mm Machine screws, Stainless Steel |
| − | :Pan rotaion - 236 - 398 degrees | + | :* 4x M2.5 Flat Washers, Stainless Steel |
| − | :Tilt range - 0-42 degrees (down) | + | :* 6x M3 x 8mm Machine Screw, Aluminum |
| + | :* 2x M3 x 10mm Machine Screw, Aluminum | ||
| + | :* 3x M3 x 10mm Stand-off, Aluminum | ||
| + | :* 1x M3 x 30mm Machine Screw, Stainless Steel | ||
| + | :* 1x M3 Nylok Nut, Stainless Steel | ||
| + | :* 2x M2 x 8mm Machine Screw, Stainless Steel | ||
| + | :* 2X M2 Hex Nut, Stainless Steel | ||
| + | :* 2x M2 x 4mm Machine Screw, Stainless Steel | ||
| + | :* 6x M2 x 5mm Flat Head Machine Screw, Steel | ||
| + | :* 1x M2 Flat Washer, Stainless Steel<br> | ||
| + | |||
| + | '''Mechanical Specifications'''<br> | ||
| + | :* Dimensions - 90mm x 55mm x 65mm | ||
| + | :* Total weight with all hardware shown - 80 grams | ||
| + | :* Pan rotaion - 236 - 398 degrees | ||
| + | :* Tilt range - 0-42 degrees (down) | ||
<br><br> | <br><br> | ||
| − | === Parts | + | === 3D Parts === |
| − | + | It is important here to makes sure your printer is calibrated for the filament you have selected as there are three critical dimensions to hit for a successful build:<br> | |
| − | ==== | + | :# The distance on the base plate between the two gear centers |
| + | :# The bearing hole diameters | ||
| + | :# The gear shaft fit into the turret base<br><br> | ||
| + | |||
| + | If you don't know whether your printer is calibrated, create or download a 20mm test cube, print it, and measure the results. If the test cube is within 0.25% (19.95mm to 20.05mm))or better of 20mm, then you are OK. If not, go through the calibration process on your printer or try scaling the print to fit.<br><br> | ||
| + | |||
| + | ==== Base Plate ==== | ||
| + | |||
| + | The base plate and bearing support plate are designed so the ball bearing just pushes in. If the bearing is to tight, a dremmel sanding tube can be used to <i>gently</i> open it up. If the bearing hole is too loose, small strips of cellophane tape can be used to tighten it up.<br><br> | ||
| + | |||
| + | The base plate needs the 4 servo mount holes tapped to M2.5 and bearing support holes cleaned up to 3mm. An alternative to the M2.5 tap is to use four M2 x 8mm machine screws with nuts and large flat washers.<br> | ||
| − | |||
{| border="0" cellspacing="1" cellpadding="1" width="95%" align="center" | {| border="0" cellspacing="1" cellpadding="1" width="95%" align="center" | ||
|- | |- | ||
| − | | align="center" | [[File: | + | | align="center" | [[File:GAP20.JPG|600px]] |
|} | |} | ||
<br><br> | <br><br> | ||
| − | ==== Bearing Plate | + | ==== Bearing Support Plate ==== |
| + | |||
| + | The support plate needs the three 3mm holes cleaned up with a 3mm drill bit and the bearing bore cleaned and checked for fit.<br> | ||
| − | |||
{| border="0" cellspacing="1" cellpadding="1" width="95%" align="center" | {| border="0" cellspacing="1" cellpadding="1" width="95%" align="center" | ||
|- | |- | ||
| − | | align="center" | [[File: | + | | align="center" | [[File:GAP25.JPG|500px]] |
|} | |} | ||
<br><br> | <br><br> | ||
| Line 133: | Line 156: | ||
==== Turret Base ==== | ==== Turret Base ==== | ||
| − | The Turret needs | + | The Turret needs 4 holes cleaned up to 3mm and the bottom interface hole cleaned up to .250" (6.35mm). It is important this is a snug fit (but not too tight!) <br> |
| + | |||
{| border="0" cellspacing="1" cellpadding="1" width="95%" align="center" | {| border="0" cellspacing="1" cellpadding="1" width="95%" align="center" | ||
|- | |- | ||
| − | | align="center" | [[File: | + | | align="center" | [[File:GAP21.JPG|350px]] |
|} | |} | ||
<br><br> | <br><br> | ||
| + | ==== Tilt Plate ==== | ||
| + | |||
| + | The Tilt plate needs 6 holes cleaned up for the M2 x 5mm flat head screws and the two pivot holes cleaned up to 3mm. Additionally, make sure the slide channel is smooth with no bumps or print berries.<br> | ||
| − | |||
{| border="0" cellspacing="1" cellpadding="1" width="95%" align="center" | {| border="0" cellspacing="1" cellpadding="1" width="95%" align="center" | ||
|- | |- | ||
| − | | align="center" | [[File: | + | | align="center" | [[File:GAP24.JPG|600px]] |
|} | |} | ||
<br><br> | <br><br> | ||
| − | ==== | + | ==== Slide Covers ==== |
| + | |||
| + | The slide covers need their 3 holes tapped to M2 -or- you can glue these plates on.<br> | ||
| − | |||
{| border="0" cellspacing="1" cellpadding="1" width="95%" align="center" | {| border="0" cellspacing="1" cellpadding="1" width="95%" align="center" | ||
|- | |- | ||
| − | | align="center" | [[File: | + | | align="center" | [[File:GAP23.JPG|500px]] |
|} | |} | ||
<br><br> | <br><br> | ||
| − | === | + | === Mechanical Parts === |
| + | |||
| + | Here you will see the "made from off-the-shelf" parts and the (machined) gear shaft.<br><br> | ||
| + | |||
| + | ==== Slide Block ==== | ||
| + | |||
| + | The slide block is made from a nylon Dubro 1/2A control horn. It has a 2mm hole drilled into it at 4mm above the bottom plate and the rest of the top material cut away. The base plate is 1.9mm thick and should have the edges slightly scraped for any rough bits.<br> | ||
| − | |||
{| border="0" cellspacing="1" cellpadding="1" width="95%" align="center" | {| border="0" cellspacing="1" cellpadding="1" width="95%" align="center" | ||
|- | |- | ||
| − | | align="center" | [[File: | + | | align="center" | [[File:GAP30.JPG|300px]] |
| + | |} | ||
| + | <br><br> | ||
| + | |||
| + | ==== Connecting Rod & Steel Clevis ==== | ||
| + | |||
| + | The connecting rod is made from a piece of "end threaded" 2-56 control wire. The threaded end is cut so 1/4" (~6mm) of the threads are left and the length is then trimmed to 2-5/16" (~59mm) . Cleanup the end with the threads so when it is threaded into the steel clevis it spins easily. This threaded connection forms the basis for the control links ability to spin with the rotation of the unit.<br> | ||
| + | |||
| + | {| border="0" cellspacing="1" cellpadding="1" width="95%" align="center" | ||
|- | |- | ||
| − | | align="center" | | + | | align="center" | [[File:GAP31.JPG|450px]] |
|} | |} | ||
<br><br> | <br><br> | ||
| + | |||
| + | ==== Servo Control Link ==== | ||
| + | |||
| + | The servo control link is also made from a Dubro control horn. The 1/2A size will work (shown below) by trimming away the material around the three holes. A longer control horn or other material can also be used with the two outside hole centers at 0.385" (9.8mm) to 0.410" (10.4mm) apart.<br> | ||
{| border="0" cellspacing="1" cellpadding="1" width="95%" align="center" | {| border="0" cellspacing="1" cellpadding="1" width="95%" align="center" | ||
|- | |- | ||
| − | | align="center" | [[File: | + | | align="center" | [[File:GAP32.JPG|250px]] |
| + | |} | ||
| + | <br><br> | ||
| + | |||
| + | ==== Servo Linkage Assembly ==== | ||
| + | |||
| + | This is where trial and error tuning is required. The linkage has three main parts: | ||
| + | |||
| + | : Servo Arm | ||
| + | : Control Link | ||
| + | : Link Connector (AKA - Linkage Stop)<br><br> | ||
| + | |||
| + | In the below picture you can see how it is all put together. All pivot points are drilled to 2mm. The M2 screw is cut-to-length and the M2 nut is held on with thin CA. It is a good idea to peen the end of the screw as well to act as a nut lock.<br> | ||
| + | |||
| + | {| border="0" cellspacing="1" cellpadding="1" width="95%" align="center" | ||
|- | |- | ||
| − | | align="center" | | + | | align="center" | [[File:GAP34.JPG|450px]] |
| + | |} | ||
| + | <br> | ||
| + | |||
| + | The link connector has its threaded end shortened to be flush to the nut and it to should be peened and CA'd.<br><br> | ||
| + | |||
| + | ==== Gear Shaft ==== | ||
| + | |||
| + | The gear shaft was the one part that was difficult to source from off the shelf components and I ended up making it on my mini lathe out of 1/4" aluminum stock. Basically it is 30mm long with a #47, 0.078" (1.99mm) hole bored through the middle. This small bore serves as a link guide and is important to smoothness.<br><br> | ||
| + | |||
| + | There are also two M2 threaded holes for securing the turret mount and the 16t gear. It is important to note the M2 screws used here must be very short so that they do not interfere with the control rods movement. | ||
| + | |||
| + | {| border="0" cellspacing="1" cellpadding="1" width="95%" align="center" | ||
| + | |- | ||
| + | | align="center" | [[File:GAP35.jpg|700px]] | ||
| + | |} | ||
| + | <br> | ||
| + | |||
| + | {| border="0" cellspacing="1" cellpadding="1" width="95%" align="center" | ||
| + | |- | ||
| + | | align="center" | [[File:GAP33.JPG|450px]] | ||
| + | |- | ||
| + | | align="center" | Assembled with the bearings and 16t gear | ||
|} | |} | ||
<br><br> | <br><br> | ||
| + | |||
| + | Depending on the aluminum you select, you <u>might</u> have to sand the tube to fit into the bearings. You can do this easily by chucking the aluminum in a drill and spinning it while sanding it. This will help keep it round. Once sized correctly, the tube should slide in the bearing with only a slight amount of resistance.<br><br> | ||
| + | |||
| + | It is important to note that the bearings are not super robust so be careful when pushing them into the base plate and bearing plate. If the hole is sized right, the bearing should push in with your fingers. Do not use a press as this will likely split the printed part. Also, do not use a hammer as this will most definately damage the bearing.<br><br> | ||
| + | ---- | ||
| + | |||
| + | '''Alternative to using a lathe'''<br> | ||
| + | I know many do not have access to a lathe so I did a little research. I found a source of tubing that was very close to what I came up with but it requires some creative shop work. <u>[http://www.ksmetals.com K&S Precision Metals]</u> makes a 1/4" x .035 wall tube which can be drilled out to 3/16" using a drill press then a piece of their 3/16 x .049 wall tubing inserted and glued in place. I did one of these to test it out and it does work well.<br><br> | ||
| + | |||
| + | K&S tubes<br> | ||
| + | :83031 1/4 x .035 x 12" | ||
| + | :83060 3/16 x .049 x 12" | ||
| + | |||
| + | In the US, K&S Metals can be found in many hardware stores such as ACE Hardware. They are also in Hobby stores and sometimes in Craft stores as well. Of course there is always Amazon as well. | ||
| + | ---- | ||
| + | <br> | ||
| + | |||
| + | === Servos === | ||
| + | |||
| + | The Pan servo, a Hitec HS-5245MG was selected because of its programmability, speed and great accuracy. It is also 23g lighter, smoother and faster than the GWS S125-1T servo I use in my HD Pan and Tilt. To program the servo you will need to get the Hitec HPP-21 digital programmer (~$27). With this tool you can change the servos speed, endpoints, center, max rotation and deadband (yes, this servo is a little pricey).<br><br> | ||
| + | |||
| + | The tilt servo is a Corona digital DS-929MG which I chose because I have a pile of them and they have always worked well for me. Just about any "9 gram" size servo can be used although you will likely have to make more adjustments to linkage parts, etc. You might also have to "adjust" or change the servo mount.<br><br> | ||
| + | |||
| + | '''Why Digital'''<br> | ||
| + | I use digitals now almost exclusively. They are better at rejecting spurious RF noise than analogs and, obviously, you can find them programmable. As far as digital servos injecting noise into the planes control system, I have found that as long as you carefully route wires, braid and twist and use ferrite rings there is no issue with this.<br><br> | ||
| + | |||
| + | === Assembly === | ||
| + | |||
| + | Here is a 3D image of assembly with the parts mostly exploded:<br> | ||
| + | |||
| + | {| border="0" cellspacing="1" cellpadding="1" width="95%" align="center" | ||
| + | |- | ||
| + | | align="center" | [[File:GAP40.JPG|800px]] | ||
| + | |} | ||
| + | <br><br> | ||
| + | |||
| + | One of the nice things about not having a servo up top is there is that much less wiring to deal with in rotation. On the Stratosrfer I simply ran three camera wires down the back of the turret and secured it with shrink-tube. I then just let it wrap/un-wrap under the canopy.<br> | ||
| + | |||
| + | {| border="0" cellspacing="1" cellpadding="1" width="95%" align="center" | ||
| + | |- | ||
| + | | align="center" | [[File:GAP48.JPG|600px]] | ||
| + | |} | ||
| + | <br><br> | ||
| + | ---- | ||
=== A Video Sample === | === A Video Sample === | ||
| + | |||
| + | Here is the teaser video I did for this project. I'll add an in-flight sample at a later date.<br> | ||
<plainhtml> | <plainhtml> | ||
<table align="center" width="900" border="0"><tr><td align="center"> | <table align="center" width="900" border="0"><tr><td align="center"> | ||
| − | <iframe width="853" height="480" src="https://www.youtube.com/embed/ | + | <iframe width="853" height="480" src="https://www.youtube.com/embed/aNr8xF61quM" frameborder="0" allow="autoplay; encrypted-media" allowfullscreen></iframe> |
| − | <p> | + | <p>Imagined and Real</p> |
</td></tr></table> | </td></tr></table> | ||
</plainhtml><br><br> | </plainhtml><br><br> | ||
| + | |||
| + | <!--<iframe width="853" height="480" src="https://www.youtube.com/embed/V0CElFcUP78" frameborder="0" allowfullscreen></iframe>--> | ||
== See Also == | == See Also == | ||
| Line 189: | Line 317: | ||
=== Project 3D Print Files === | === Project 3D Print Files === | ||
| − | The following are the 3D print | + | The following are the 3D print files used in this specific build:<br> |
| − | :* [http://www.itsqv.com/share/ | + | :* [http://www.itsqv.com/share/Geared_Aero_PnT_STL.zip STL Package] |
| − | + | ||
| − | + | ||
| − | + | ||
<br> | <br> | ||
=== Where to buy the parts === | === Where to buy the parts === | ||
| − | :* For the | + | :* For the gears, bearings and pan servo - |
:: In the US - <u>[http://www.ServoCity.com/default.asp ServoCity]</u> | :: In the US - <u>[http://www.ServoCity.com/default.asp ServoCity]</u> | ||
| − | :: In Europe - <u>[https://www.steplab.net | + | :: In Europe - <u>[https://www.steplab.net StepLab]</u> |
| − | :* For the | + | :* For all the Dubro parts - |
| − | :: | + | :: <u>[https://www.dubro.com/ Dubro.com]</u> |
<br> | <br> | ||
=== Comments? Questions? === | === Comments? Questions? === | ||
| − | :* '''<u>[mailto:qmar80@hotmail.com?Subject=About%20The% | + | :* '''<u>[mailto:qmar80@hotmail.com?Subject=About%20The%20Geared%20Aerodynamic%20Pan%20and%20Tilt&body=Question? email me!]</u>''' |
<br><br><br> | <br><br><br> | ||
| − | + | [[Category:Contents]] | |
[[Category:Marks]] | [[Category:Marks]] | ||
Latest revision as of 12:19, 12 September 2018
| |
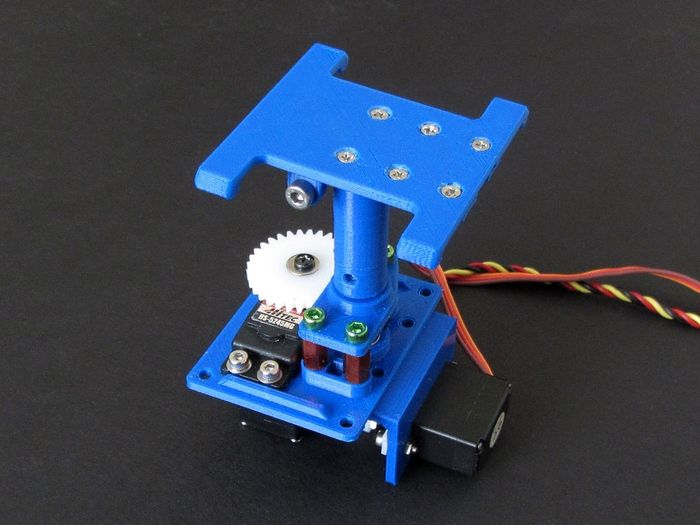
| Aerodynamic and Accurate! |
Introduction
- NOTE - 24 March, 2018 - NOTE: It was pointed out to me by poster Mochanic on RCG that I had the wrong 26 tooth drive gear listed in the parts section which has now been corrected to the correct 32 tooth drive gear. Apologies for the inconvenience!
Having designed and released a pile of different Pan and Tilt units I decided to try and make something a little different. I came up with a list of simple design goals that were based on requests and experiences with other PnT's. The list then, in (my) order of importance is:
- Lighter and Faster than my HD Pan and tilt which is around 100g
- - New weight is ~80g with the components shown here
- Is smooth and precise with excellent centering
- - With a new, fully programmable digital Hitec HS-5245MG servo, it is extremely smooth and centers beautifully
- Is more aerodynamic
- - Now with both servos mounted below the deck, it is very aerodynamic
- Can be made from off-the-shelf components
- - All but one component is made from standard off-the-shelf parts (see text)
- Rotates 360° or more
- - Rotation can be programmed from 236° to 398°
- Tilts down 50 degrees or more
- - Tilts down 42° (see text)
As you can see I came pretty close to hitting most of these goals. For the two I missed a little:
- - The one component which could not easily be made from off the shelf parts is the aluminum gear shaft which I turned in a mini lathe. There is more information on this in the build section.
- - The tilt-down spec can and will likely change. The cost for increasing tilt-down is the assembly gets taller, a little harder to make smooth and slightly less aerodynamic. I was happy with 42° as this is more than enough for the planes I plane to use it on.
NOTE Apologies to all followers in Europe and Australia! The components selected started with a new (awesome) drive gear from ServoCity.com which I know can be very hard to find outside the US. This new drive gear comes with the Hitec C1 spline already molded in which made the design and subsequent build much easier. Of course this also means the gear shaft and bearings are also imperial dimensions.
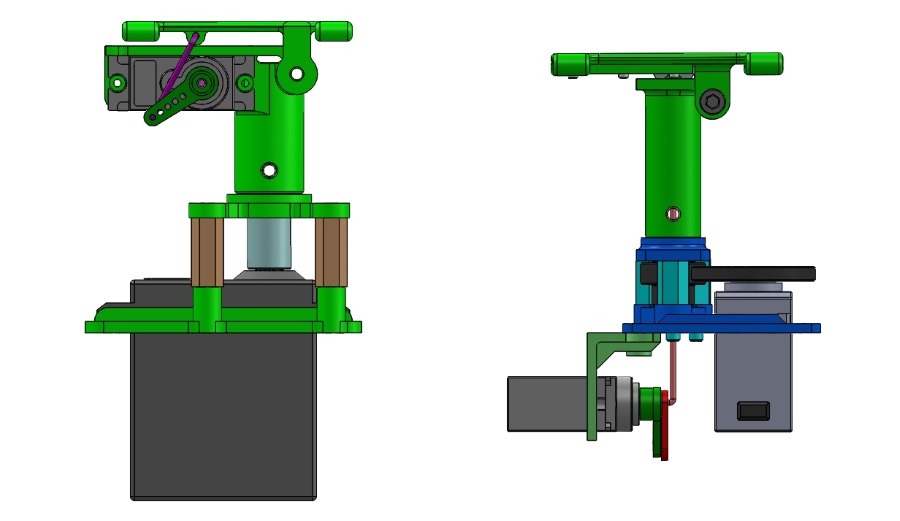
The new unit has a lower profile than the HD unit and needs a smaller through-deck hole:
|
| HD and Aerodynamic Pan and Tilts |
Configurations
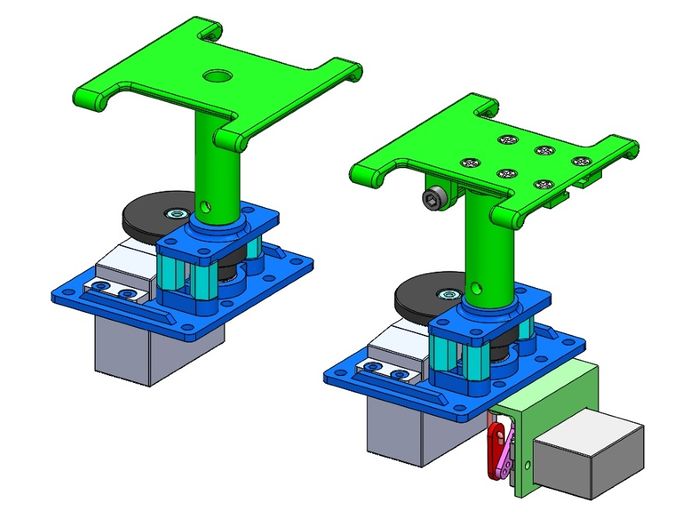
For this project I decided to keep it simple so there is only one pan-only setup and one tilt setup. I will likely add a custom RunCam Split deck like I have done on my Offset Pan and Tilt in the future.
|
| Pan-only and Tilt decks |
The Build
On any project such as this, understanding the work scope and finding the resources needed is a key to success. For the full tilt version there are 6 3D print parts that require some detail work and one aluminum gear shaft that will require some machining.
Parts and Specifications
The parts shown here are what was used on the unit when released. This list can change over time as I look for ways to improve it.
Print Parts
- 52161 Base Plate
- 52162 Bearing Support Plate
- 52163 Mount Bracket, Tilt Servo
- 52164 Turret Mount
- 52165 Camera Deck
- 52166 Slide Covers
- 52167 Pan Deck
- Printable STL files are at the bottom of this page
Off the Shelf Parts
- 2x Dubro #107 1/2A Control Horns (one pair)
- 1x Dubro #109 2-56 Spring Steel Kwik-Link Clevis
- 1x Dubro #172 2-56 Threaded Rod
- 1x Pushrod Linkage Stopper D2.1mm
- 1x ServoCity #RSA32-2HS-32 32 pitch/32 tooth Acetyl Servo Gear - C1 Spline
- 1x ServoCity #SPBD32-34-16 32 pitch/16 tooth Acetyl Plain Bore Gear
- 2x ServoCity #535018 .250"ID x .375"OD x .125"L Non-Flanged Ball Bearing w/Dual Shield
Servos
- Pan - Hitec HS-5245MG digital programmable Mini Servo (32g)
- Also needed - Hitec HPP-21 PC Digital Servo Programmer
- Tilt - Corona DS929MG digital micro servo (14.1g)
- NOTE: This project was designed specifically around the two servos shown
Fasteners
- 4x M2.5x6mm Machine screws, Stainless Steel
- 4x M2.5 Flat Washers, Stainless Steel
- 6x M3 x 8mm Machine Screw, Aluminum
- 2x M3 x 10mm Machine Screw, Aluminum
- 3x M3 x 10mm Stand-off, Aluminum
- 1x M3 x 30mm Machine Screw, Stainless Steel
- 1x M3 Nylok Nut, Stainless Steel
- 2x M2 x 8mm Machine Screw, Stainless Steel
- 2X M2 Hex Nut, Stainless Steel
- 2x M2 x 4mm Machine Screw, Stainless Steel
- 6x M2 x 5mm Flat Head Machine Screw, Steel
- 1x M2 Flat Washer, Stainless Steel
Mechanical Specifications
- Dimensions - 90mm x 55mm x 65mm
- Total weight with all hardware shown - 80 grams
- Pan rotaion - 236 - 398 degrees
- Tilt range - 0-42 degrees (down)
3D Parts
It is important here to makes sure your printer is calibrated for the filament you have selected as there are three critical dimensions to hit for a successful build:
- The distance on the base plate between the two gear centers
- The bearing hole diameters
- The gear shaft fit into the turret base
If you don't know whether your printer is calibrated, create or download a 20mm test cube, print it, and measure the results. If the test cube is within 0.25% (19.95mm to 20.05mm))or better of 20mm, then you are OK. If not, go through the calibration process on your printer or try scaling the print to fit.
Base Plate
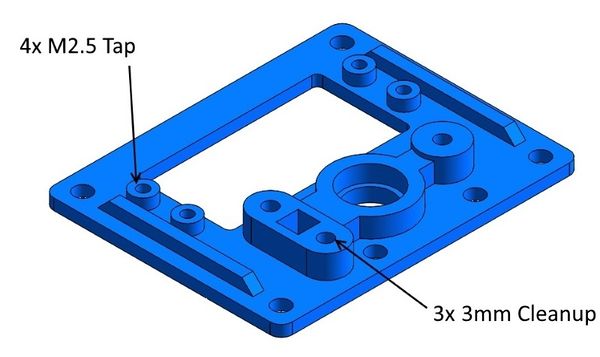
The base plate and bearing support plate are designed so the ball bearing just pushes in. If the bearing is to tight, a dremmel sanding tube can be used to gently open it up. If the bearing hole is too loose, small strips of cellophane tape can be used to tighten it up.
The base plate needs the 4 servo mount holes tapped to M2.5 and bearing support holes cleaned up to 3mm. An alternative to the M2.5 tap is to use four M2 x 8mm machine screws with nuts and large flat washers.
|
Bearing Support Plate
The support plate needs the three 3mm holes cleaned up with a 3mm drill bit and the bearing bore cleaned and checked for fit.
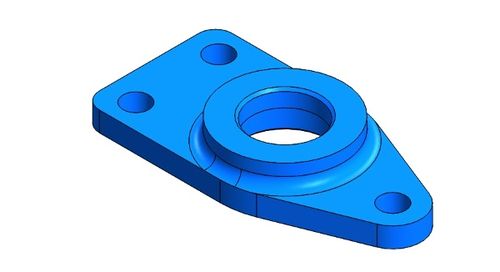
|
Turret Base
The Turret needs 4 holes cleaned up to 3mm and the bottom interface hole cleaned up to .250" (6.35mm). It is important this is a snug fit (but not too tight!)
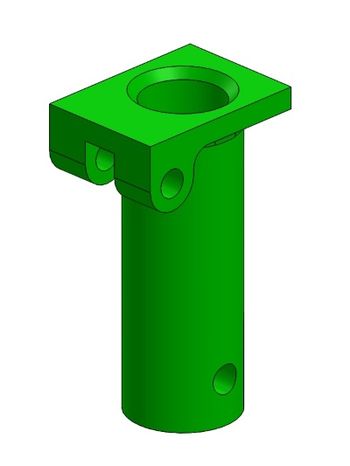
|
Tilt Plate
The Tilt plate needs 6 holes cleaned up for the M2 x 5mm flat head screws and the two pivot holes cleaned up to 3mm. Additionally, make sure the slide channel is smooth with no bumps or print berries.
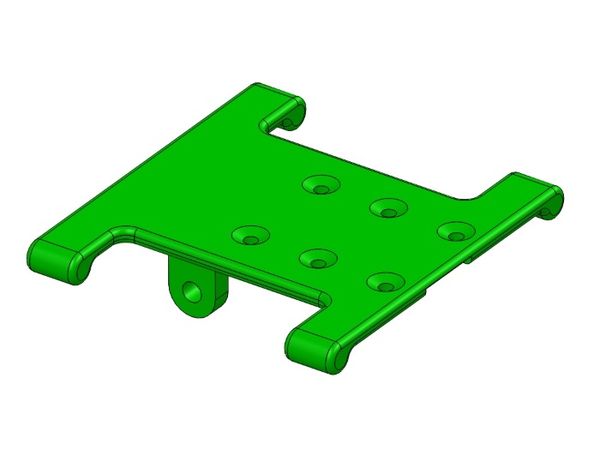
|
Slide Covers
The slide covers need their 3 holes tapped to M2 -or- you can glue these plates on.
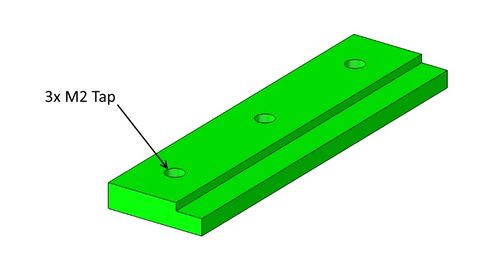
|
Mechanical Parts
Here you will see the "made from off-the-shelf" parts and the (machined) gear shaft.
Slide Block
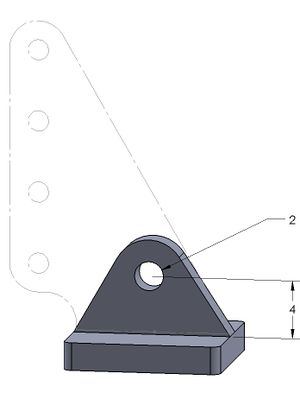
The slide block is made from a nylon Dubro 1/2A control horn. It has a 2mm hole drilled into it at 4mm above the bottom plate and the rest of the top material cut away. The base plate is 1.9mm thick and should have the edges slightly scraped for any rough bits.
|
Connecting Rod & Steel Clevis
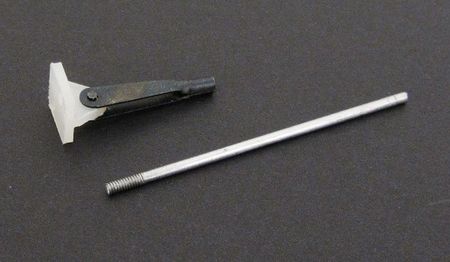
The connecting rod is made from a piece of "end threaded" 2-56 control wire. The threaded end is cut so 1/4" (~6mm) of the threads are left and the length is then trimmed to 2-5/16" (~59mm) . Cleanup the end with the threads so when it is threaded into the steel clevis it spins easily. This threaded connection forms the basis for the control links ability to spin with the rotation of the unit.
|
Servo Control Link
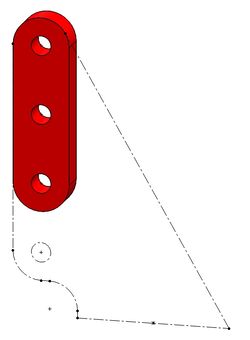
The servo control link is also made from a Dubro control horn. The 1/2A size will work (shown below) by trimming away the material around the three holes. A longer control horn or other material can also be used with the two outside hole centers at 0.385" (9.8mm) to 0.410" (10.4mm) apart.
|
Servo Linkage Assembly
This is where trial and error tuning is required. The linkage has three main parts:
- Servo Arm
- Control Link
- Link Connector (AKA - Linkage Stop)
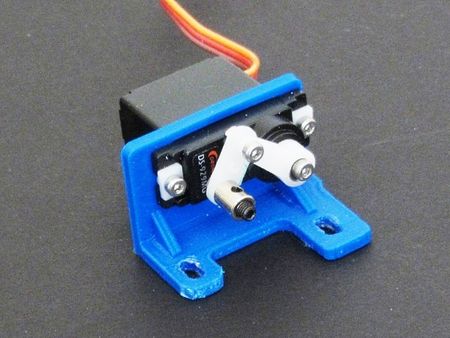
In the below picture you can see how it is all put together. All pivot points are drilled to 2mm. The M2 screw is cut-to-length and the M2 nut is held on with thin CA. It is a good idea to peen the end of the screw as well to act as a nut lock.
|
The link connector has its threaded end shortened to be flush to the nut and it to should be peened and CA'd.
Gear Shaft
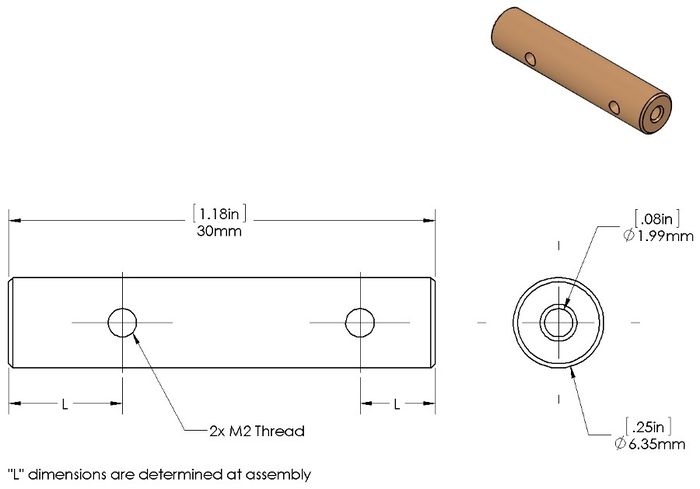
The gear shaft was the one part that was difficult to source from off the shelf components and I ended up making it on my mini lathe out of 1/4" aluminum stock. Basically it is 30mm long with a #47, 0.078" (1.99mm) hole bored through the middle. This small bore serves as a link guide and is important to smoothness.
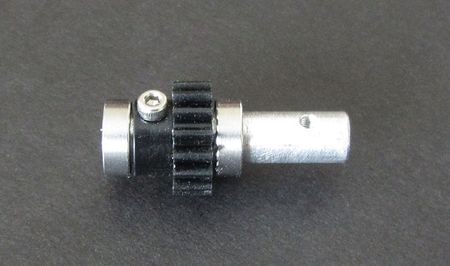
There are also two M2 threaded holes for securing the turret mount and the 16t gear. It is important to note the M2 screws used here must be very short so that they do not interfere with the control rods movement.
|
|
| Assembled with the bearings and 16t gear |
Depending on the aluminum you select, you might have to sand the tube to fit into the bearings. You can do this easily by chucking the aluminum in a drill and spinning it while sanding it. This will help keep it round. Once sized correctly, the tube should slide in the bearing with only a slight amount of resistance.
It is important to note that the bearings are not super robust so be careful when pushing them into the base plate and bearing plate. If the hole is sized right, the bearing should push in with your fingers. Do not use a press as this will likely split the printed part. Also, do not use a hammer as this will most definately damage the bearing.
Alternative to using a lathe
I know many do not have access to a lathe so I did a little research. I found a source of tubing that was very close to what I came up with but it requires some creative shop work. K&S Precision Metals makes a 1/4" x .035 wall tube which can be drilled out to 3/16" using a drill press then a piece of their 3/16 x .049 wall tubing inserted and glued in place. I did one of these to test it out and it does work well.
K&S tubes
- 83031 1/4 x .035 x 12"
- 83060 3/16 x .049 x 12"
In the US, K&S Metals can be found in many hardware stores such as ACE Hardware. They are also in Hobby stores and sometimes in Craft stores as well. Of course there is always Amazon as well.
Servos
The Pan servo, a Hitec HS-5245MG was selected because of its programmability, speed and great accuracy. It is also 23g lighter, smoother and faster than the GWS S125-1T servo I use in my HD Pan and Tilt. To program the servo you will need to get the Hitec HPP-21 digital programmer (~$27). With this tool you can change the servos speed, endpoints, center, max rotation and deadband (yes, this servo is a little pricey).
The tilt servo is a Corona digital DS-929MG which I chose because I have a pile of them and they have always worked well for me. Just about any "9 gram" size servo can be used although you will likely have to make more adjustments to linkage parts, etc. You might also have to "adjust" or change the servo mount.
Why Digital
I use digitals now almost exclusively. They are better at rejecting spurious RF noise than analogs and, obviously, you can find them programmable. As far as digital servos injecting noise into the planes control system, I have found that as long as you carefully route wires, braid and twist and use ferrite rings there is no issue with this.
Assembly
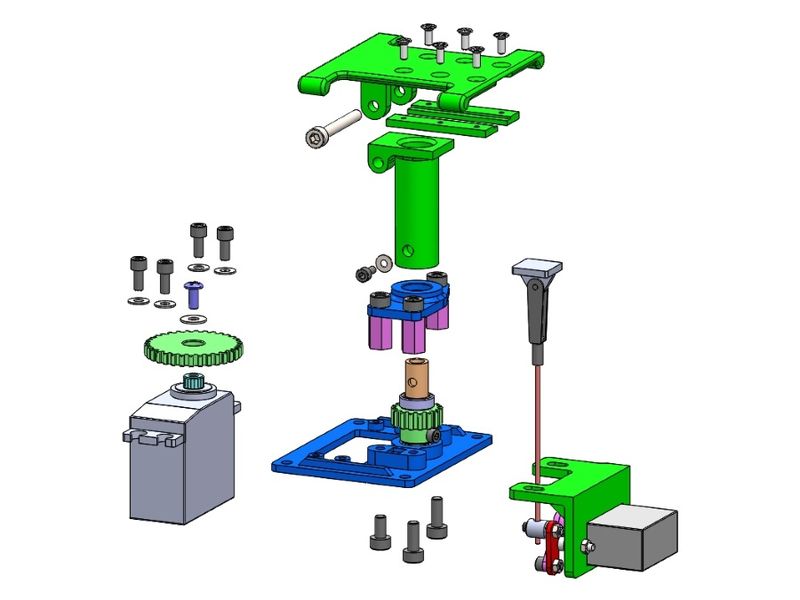
Here is a 3D image of assembly with the parts mostly exploded:
|
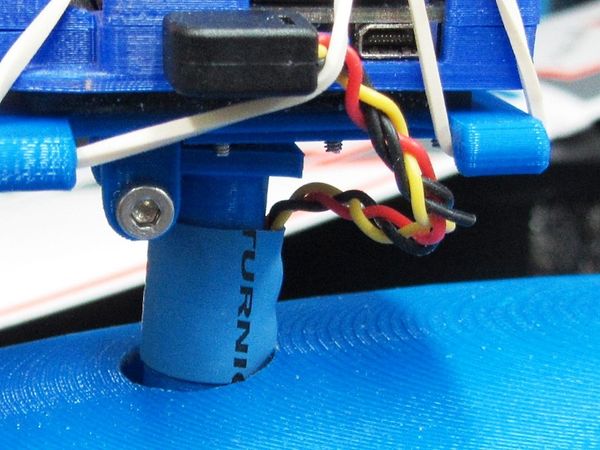
One of the nice things about not having a servo up top is there is that much less wiring to deal with in rotation. On the Stratosrfer I simply ran three camera wires down the back of the turret and secured it with shrink-tube. I then just let it wrap/un-wrap under the canopy.
|
A Video Sample
Here is the teaser video I did for this project. I'll add an in-flight sample at a later date.
|
Imagined and Real |
See Also
Project 3D Print Files
The following are the 3D print files used in this specific build:
Where to buy the parts
- For the gears, bearings and pan servo -
- For all the Dubro parts -
Comments? Questions?