Difference between revisions of "Canopy Spring Latch"
(→Here's One Source) |
(→Can you Print this?) |
||
| (14 intermediate revisions by the same user not shown) | |||
| Line 1: | Line 1: | ||
| − | == Introduction == | + | [[File:cc_image.png|20px]]<i><small> Mark Qvale - July, 2020</small></i><br> |
| + | {| cellspacing="1" cellpadding="1" width="95%" border="0" | ||
| + | |- | ||
| + | | align="left" valign="top" width="30%" | __TOC__ | ||
| + | | align="right" valign="top" width="70%" | [[File:CSL02.JPG|650px]] | ||
| + | |- | ||
| + | | | ||
| + | | | ||
| + | |} | ||
| + | |||
| + | == <br>Introduction == | ||
Many folks have asked "where do you get the canopy latch you show in your canopies?". The answer is "many places" and then there are the modifications I do...<br><br> | Many folks have asked "where do you get the canopy latch you show in your canopies?". The answer is "many places" and then there are the modifications I do...<br><br> | ||
| − | === | + | === Where to Buy === |
| − | Below are three of the type I use found on the HobbyKing website. You can find these latches on Amazon as well as many online RC stores. The title above each picture is searchable on the | + | Below are three of the type I use found on the <u>[https://hobbyking.com/ HobbyKing]</u> website (HobbyKing pictures). You can find these latches on Amazon as well as many online RC stores. The title above each picture is searchable on the HobbyKing site. |
<br><br> | <br><br> | ||
| Line 32: | Line 42: | ||
<br><br> | <br><br> | ||
| − | Of these three, the first one, which is all plastic, is the most susceptible to breakage so I generally don't recommend it unless you modify it by getting rid of the plastic actuator. | + | Of these three, the first one, which is all hard plastic, is the most susceptible to breakage so I generally don't recommend it unless you modify it (see below) by getting rid of the plastic actuator. |
<br><br> | <br><br> | ||
| Line 43: | Line 53: | ||
=== Mods === | === Mods === | ||
| − | The modifiction I do to these is to replace the actuator arm with a | + | The modifiction I do to these is to replace the actuator arm with a shaft collar and socket head screw. This makes it much more durable and in some cases easier to install and adjust. Here is one that I modified- |
| − | + | <br> | |
| − | |||
{| border="0" cellspacing="1" cellpadding="1" align="center" | {| border="0" cellspacing="1" cellpadding="1" align="center" | ||
|- | |- | ||
| − | | align="center" | [[File: | + | | align="center" | [[File:CSL01.JPG|600px]] |
| − | |} | + | |} |
<br><br> | <br><br> | ||
| − | With the shaft collar, you can adjust the length of the pin without having to cut the metal rod. | + | With the shaft collar, you can adjust the length of the pin without having to cut the metal rod. The unit shown uses a 3/32" shaft collar and 4-40 socket head screw. You can also use a 2mm shaft collar and its corresponding set screw. |
<br><br> | <br><br> | ||
=== Can you Print this? === | === Can you Print this? === | ||
| − | If you have a printer that can print at a .1mm resolution | + | If you have a printer that can print at a .1mm resolution, yes! You'll have to find 2mm steel rod material for the pin and a shaft collar with set screw. The spring can be taken from a ball point pen. |
<br> | <br> | ||
| Line 65: | Line 74: | ||
| align="center" | [[File:CSL15.jpg|500px]] | | align="center" | [[File:CSL15.jpg|500px]] | ||
|} | |} | ||
| − | + | <br> | |
| − | Here is the STL if you want to try | + | Here are design dimensions of the printed part: |
| + | <br> | ||
| + | |||
| + | {| border="0" cellspacing="1" cellpadding="1" align="center" | ||
| + | |- | ||
| + | | align="center" | [[File:CSL18.JPG|600px]] | ||
| + | |} | ||
| + | <br> | ||
| + | |||
| + | Image is the printed version using the pin and spring from one of the cheap plastic units: | ||
| + | <br> | ||
| + | |||
| + | {| border="0" cellspacing="1" cellpadding="1" align="center" | ||
| + | |- | ||
| + | | align="center" | [[File:CSL19.JPG|500px]] | ||
| + | |} | ||
| + | <br> | ||
| + | |||
| + | Below is the STL link if you want to try this printed version.<br> | ||
| + | '''Update, 17 July, 2020: Added four mount holes so mounting is identical to original plastic piece. Also, cleaned up clearances and tolerances so very little (if any) clean-up should be needed.''' | ||
<br> | <br> | ||
| Line 75: | Line 103: | ||
== See Also == | == See Also == | ||
| − | :* | + | === Vendors === |
| + | |||
| + | :* '''<u>[https://hobbyking.com/ HobbyKing]</u>''' | ||
<br><br> | <br><br> | ||
| Line 84: | Line 114: | ||
<br><br><br> | <br><br><br> | ||
| − | [[Category: | + | [[Category:Contents]] |
Latest revision as of 18:32, 17 July 2020
| |
Introduction
Many folks have asked "where do you get the canopy latch you show in your canopies?". The answer is "many places" and then there are the modifications I do...
Where to Buy
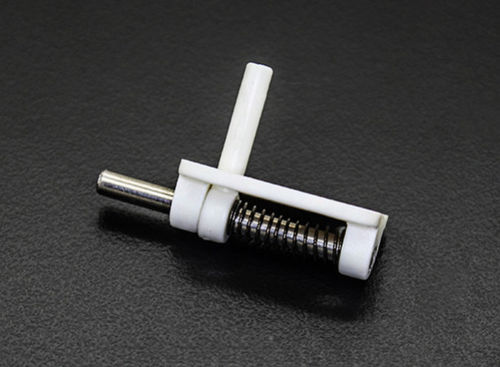
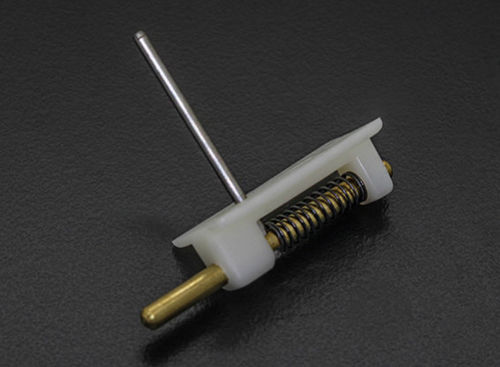
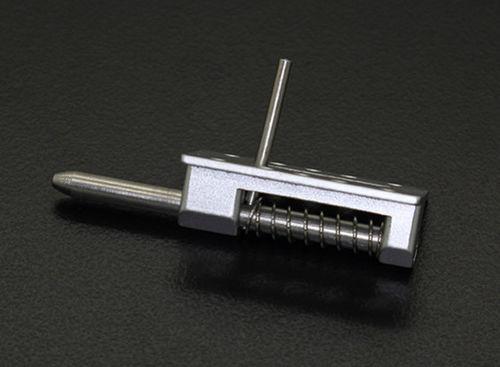
Below are three of the type I use found on the HobbyKing website (HobbyKing pictures). You can find these latches on Amazon as well as many online RC stores. The title above each picture is searchable on the HobbyKing site.
Canopy Lock Latch (2pc)
|
Canopy Lock / Latch Spring Loaded (2pc)
|
Aluminum Canopy Lock / Latch Spring Loaded
|
Of these three, the first one, which is all hard plastic, is the most susceptible to breakage so I generally don't recommend it unless you modify it (see below) by getting rid of the plastic actuator.
All three can be found on this HobbyKing page - Spring Latches
You can also find these on many other RC store sites.
Mods
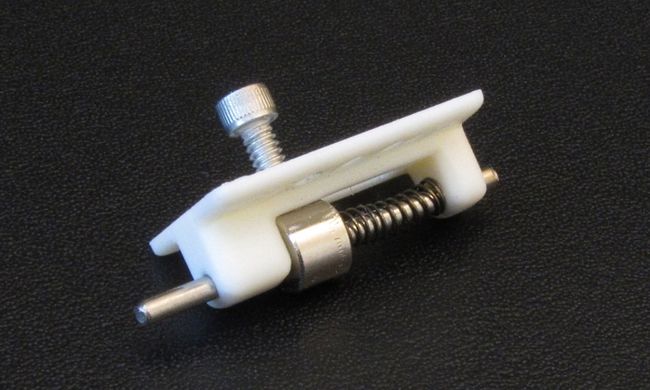
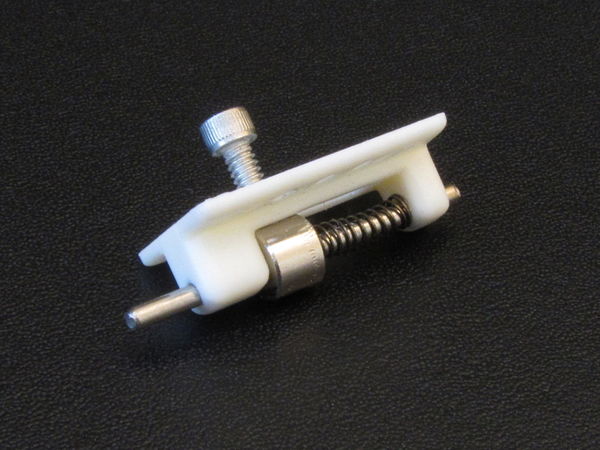
The modifiction I do to these is to replace the actuator arm with a shaft collar and socket head screw. This makes it much more durable and in some cases easier to install and adjust. Here is one that I modified-
|
With the shaft collar, you can adjust the length of the pin without having to cut the metal rod. The unit shown uses a 3/32" shaft collar and 4-40 socket head screw. You can also use a 2mm shaft collar and its corresponding set screw.
Can you Print this?
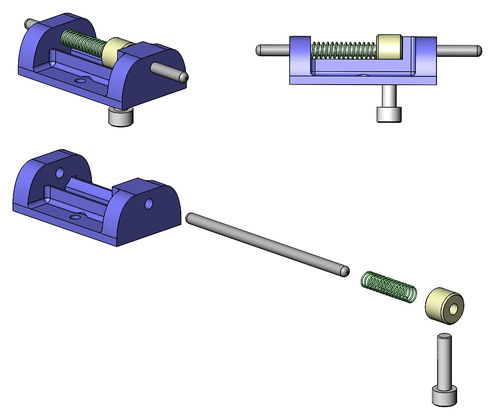
If you have a printer that can print at a .1mm resolution, yes! You'll have to find 2mm steel rod material for the pin and a shaft collar with set screw. The spring can be taken from a ball point pen.
|
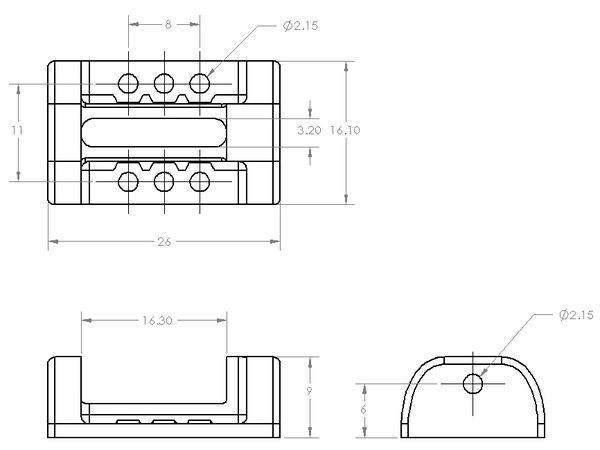
Here are design dimensions of the printed part:
|
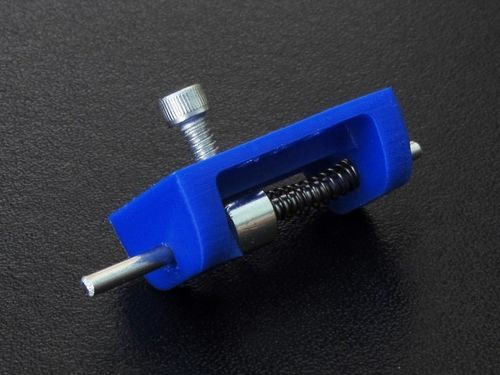
Image is the printed version using the pin and spring from one of the cheap plastic units:
|
Below is the STL link if you want to try this printed version.
Update, 17 July, 2020: Added four mount holes so mounting is identical to original plastic piece. Also, cleaned up clearances and tolerances so very little (if any) clean-up should be needed.
See Also
Vendors
Comments? Questions?