Difference between revisions of "Strix StratoSurfer Twin Conversion"
(→Motor Mount Body Install) |
(→Motor Mount Body Install) |
||
| Line 171: | Line 171: | ||
<br> | <br> | ||
| − | ''' ESC | + | ''' ESC Mounting'''<br> |
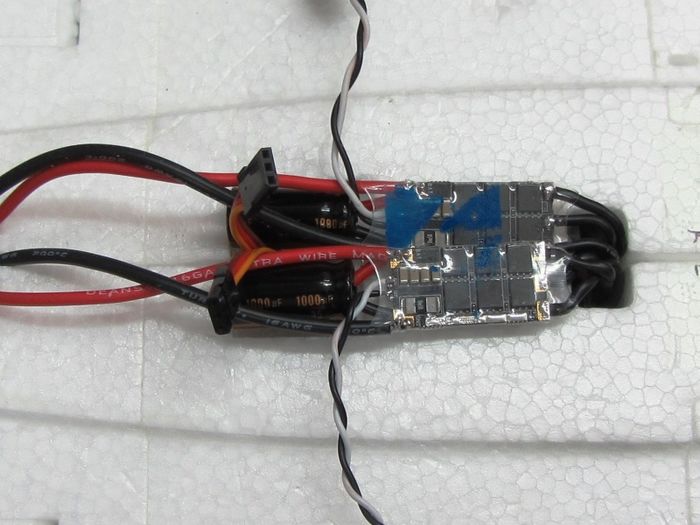
| − | I decided to simply use hot glue to attach the ESC's to the bottom of the wing. I did have to cut small notches to | + | I decided to simply use hot glue to attach the ESC's to the bottom of the wing. I did have to cut small notches to accommodate the two capacitors but this was easy enough.<br> |
{| border="0" cellspacing="1" cellpadding="1" width="700" align="center" | {| border="0" cellspacing="1" cellpadding="1" width="700" align="center" | ||
Revision as of 14:13, 2 February 2019
| |
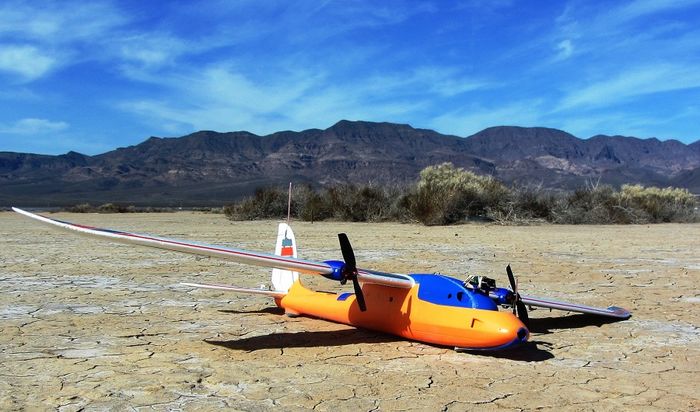
| Super Stratosurfer! |
Introduction
I have found that I have no love for the top mounted motor gliders. I love the way the Strix StratoSurfer flys especially with the Matek F405-wing controller running Chibios/Arduplane but, that top motor is a PITA in terms of trimming the plane, noise and launches nosing in. So with that and after one year with this plane I've decided to convert it to a twin tractor set-up.
Below are my build notes, print files and a flight review of this re-configured plane.
General Specifications
Seller - ReadyMadeRC, USA
Aircraft - Strix Stratosurfer
Build Date - February, 2019
| Airframe Type - | Top Wing FPV Specialist | All-Up Weight - | 60oz (1698g) w/7Ah/4S Liion Pack | |
| Wingspan - | 59 inches (1500mm) | 61oz (1706g) w/5.2Ah/4S MS Pack | ||
| Length - | 39 inches (1000mm) | COG - | 70mm @ Wing root | |
| Wing Area - | 2.95 ft^2 (27.4dm^2) | Wing Load w/5200mAh/4S - | 20.7 oz/ft^2 (62g/dm^2) | |
| Motors - | iFlight 2207-1750kv | Max Power (4S) - | 640 watts (4S) | |
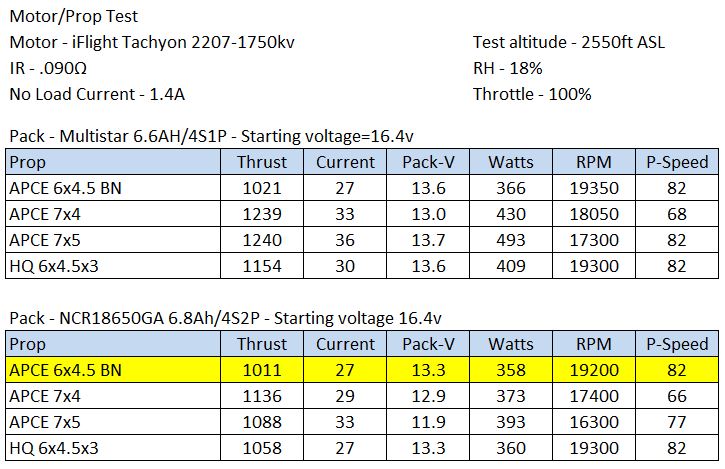
| Propeller - | L&R APCe 6x4.5 Bullnose | Prop Power - | 440 watts @ 2550ft ASL | |
| Thrust & Prop Speed - | 2022g & 82mph @ 2550ft ASL | Thrust/Weight - | 1.2:1 | |
| Battery Type - | 4S1P Lipo -or- 4S2P Li-ion | Battery Capacity - | 5200mAh/10C or 7000mah/3C | |
| In flight efficiency - | <125mAh/mile (<78mAh/km) Typ. | Flight Time - | 80 min | |
Components/Flight Gear
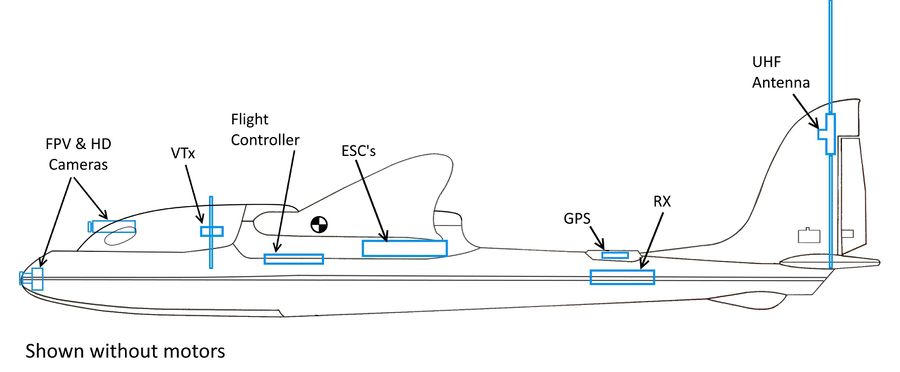
Below is the approximate layout of installed components:
|
Power Set-up
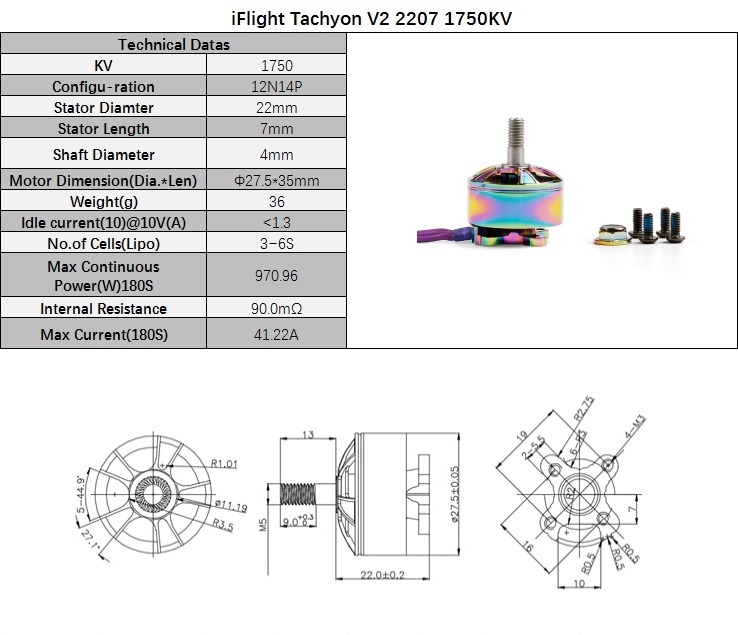
For power on this build I plan to start with iFlight 2207-1750kv motors and 35A Wraith32 BLHELI ESC's with active freewheeling. I've also added a pair of 1000mfd/35v Low ESR capacitors for noise and v-spike damping.
- Motor - iFlight 2207-1750kv
- ESC - 35A Wraith32 BLHELI
- Prop - APCe 6 x 4.5 Bull Nose
- Battery - Multistar 4S/5200, 10C or a 4S/7000 Li-Ion
|
| Published specs for the iFlight motor |
|
| Prop chart for the iFlight motor |
Motor Mounts
This design is very similar to some that I did for the Mini Talon. My goal was to make it light, slippery and strong. For my build I printed these in Hatchbox ABS filament at .2mm quality.
| 600px |
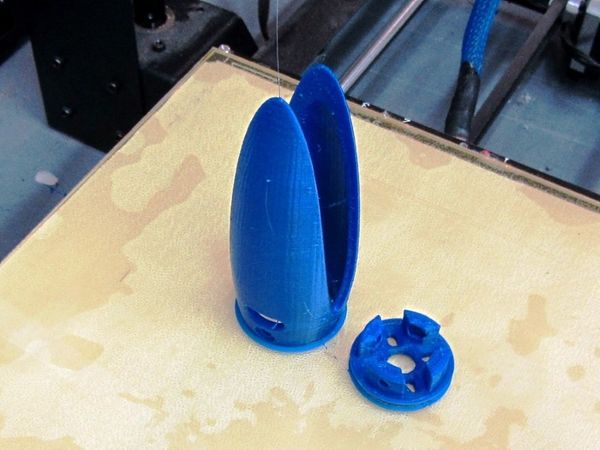
|
| Print orientation |
Motor Mount Body Install
Mounting these is simple enough. Put the wing halves together on the wing spar, measure 200mm either side of the center and set some pins for location. 200mm doesn't interfere with flap servos should you choose this option and you can run up to about a 10" prop. Make sure the mount bodies are pushed all the way into the leading edge and use a straight edge to ensure the front faces are parallel. Glue and clamp them in place for 24hrs. I use E6000 glue as it works very well attaching PLA, PETG and ABS to EPO foam. Other glues that also work very well are UHU-POR, Beacons FoamTac and Gorilla Clear Contact cement. Do not use Gorilla expanding glue as it does not bond well to EPO and heat cycling can cause it to separate.
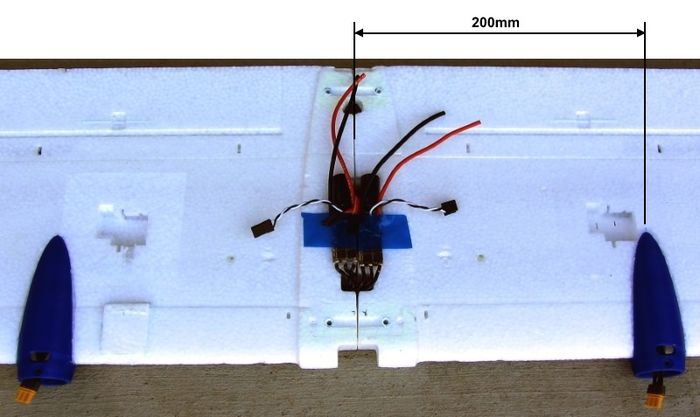
|
Front Piece
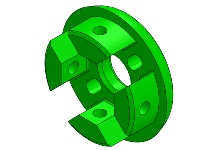
After printing use a clamp to maintain the integrity of the front piece and tap the four radial holes to M3. Once tapped, coat the threads with thin CA to add strength. You may have to file or sand the outside diameter of the four ears so the front piece will fit into the main mount body.
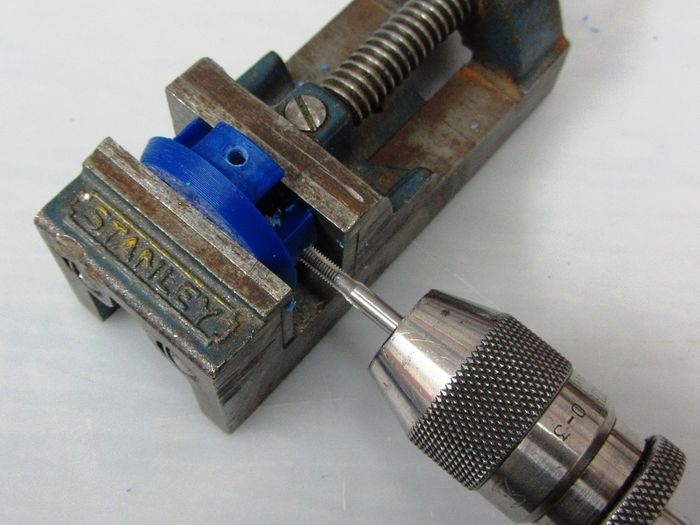
|
| Clamped front piece |
Motor Wire Routing
For wire routing I hot-wired a hole in the center of the motor mount, below the leading edge to a depth of ~50mm. This coincides with a hollow area that goes nearly to the wing root. You will have to go under a small leading edge spar and angle the hole upwards a bit. I then hot-wired a hole centered in the front/center notch deep enough to access the same hollow area. I ran a piece of silicone wire so that I could pull the ESC/motor wires through the wing to the front of the mount. Last I soldered on R30 - 2.0mm x 3 pin motor connectors and the ESC's.
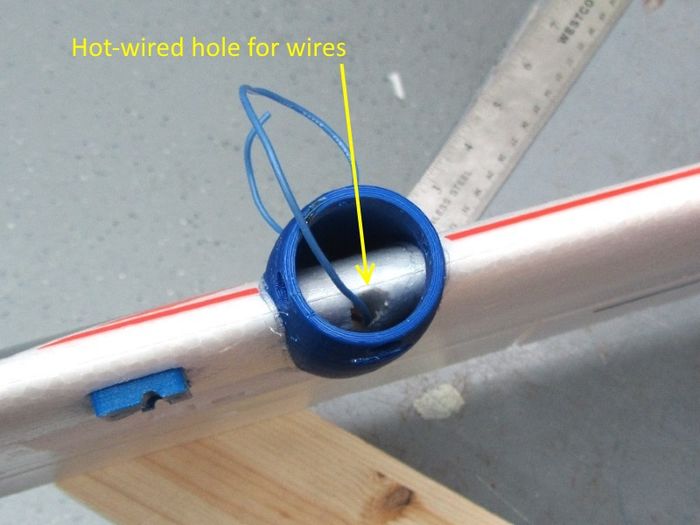
|
| Wire route |
ESC Mounting
I decided to simply use hot glue to attach the ESC's to the bottom of the wing. I did have to cut small notches to accommodate the two capacitors but this was easy enough.
|
| ESC craddle |
Wing Mount
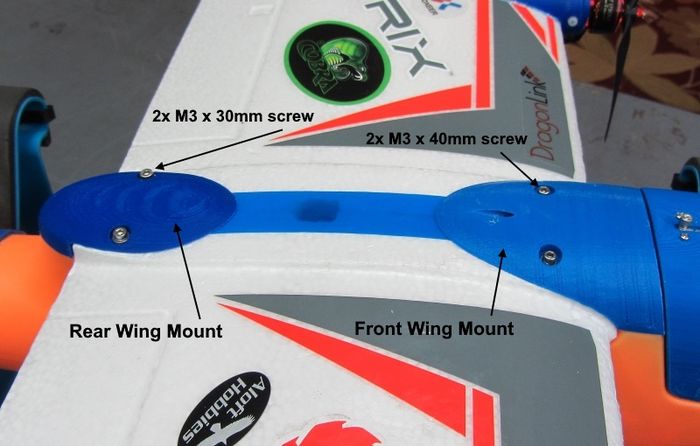
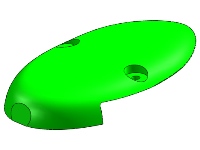
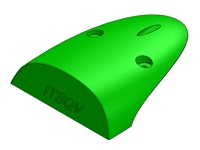
The front wing mount comes from the Stratosurfer catalog low-profile canopies and uses 2 - M3 x 40mm screws. The rear wing mount is a copy of the lower portion of the Cobra motor mount and uses 2 - M3 x 30mm screws.
|
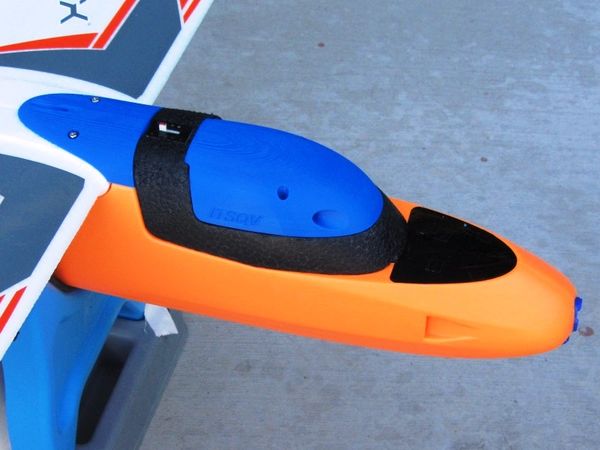
If you are not using one of my low profile canopies, you will need to shave the stock foam canopy down to match the profile.
|
| Example of a shaved foam canopy |
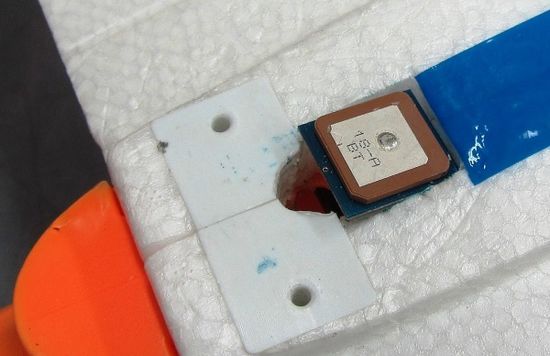
Underneath the rear wing mount I have installed the BN-220 GPS module. It works well here however it is just another wire to hook up if/when you remove and replace the wing. Another good location is on the small rear hatch (where I had it originally).
|
Flight Control
Since I am already using the Matek F405-wing flight controller with Chibios/Arduplane firmware there is absolutely no reason to change this, it is fantastic!
Links to this board -
GPS
For the GPS I am using the Beitian BN-220 mini ublox unit from Banggood.com. I have mounted it under the rear wing mount cover.
Re-Maiden!
Maiden - 01 February, 2019
Weather was perfect with temp at ~70F a very light breeze and clear skies. The first flight was uneventful in terms of drama and I flew her for about 20 minutes. In two subsequent flights I did an uneventful hand launch a session of auto-tune and lots of rolls, loops and other shennanigans. From a flying standpoint, the Stratosurfer as a Twin flies exceptionally well, better I think than with the top mount motor. The power setup I put together for these first flights was certainely powerful enough and amazingly quiet and smooth. With a hard/static mounted Mobius, I saw no jello at any time in the HD recording.
Video
- TBA
Parting Shot
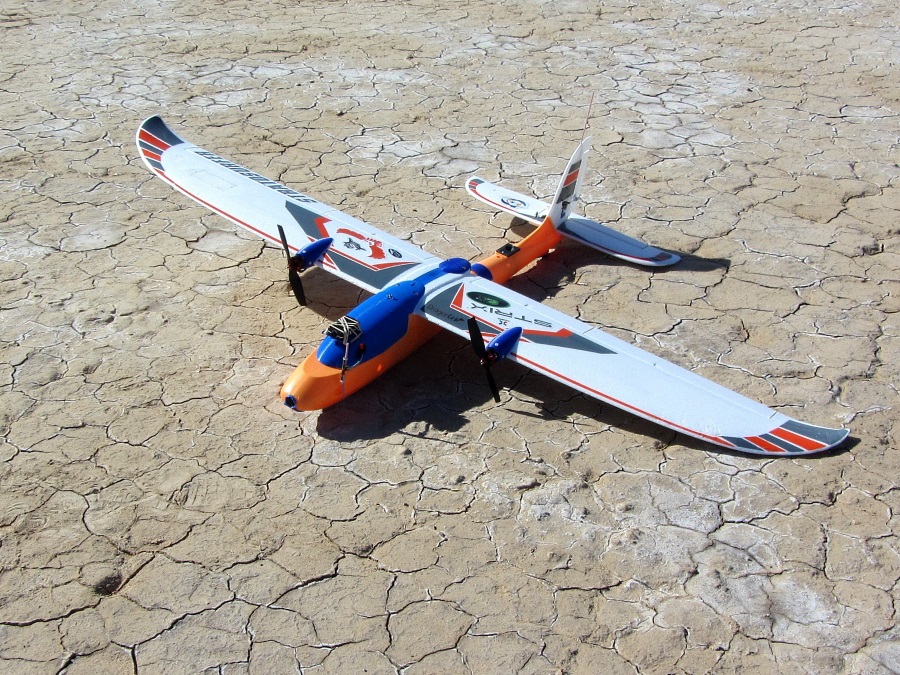
|
| What a great day! |
Project 3D Print Files
| Image | Part Number | Part Description | Weight | Print File | Compatibility Notes |
|
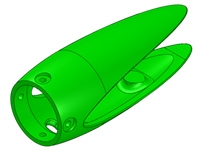
52192 | Stratosurfer Twin Motor Mount Body | 25g | 52192.STL | 22xx size motor mount |
|
52193 | Stratosurfer Twin Motor Mount Front | 27g | 52193.STL | Fits into the mount body, 52192 |
|
52194 | Stratosurfer Rear Wing Mount | 3.5g | 52194.STL | Clamping cover for the rear wing mount |
|
52156 | Stratosurfer Front Wing Mount | 11.6g | 52156.STL | Low profile wing mount and cover |
See Also
Some of the Vendors I used for this project
Comments? Questions?