Difference between revisions of "Pan & Tilt Brushless Gimbal"
(→Dimensions) |
|||
| (5 intermediate revisions by the same user not shown) | |||
| Line 1: | Line 1: | ||
[[File:BTI.png|link=GIMBALS|Gimbals]]<br> | [[File:BTI.png|link=GIMBALS|Gimbals]]<br> | ||
| − | |||
<i>August 2015</i><br> | <i>August 2015</i><br> | ||
<br> | <br> | ||
| Line 14: | Line 13: | ||
== Introduction == | == Introduction == | ||
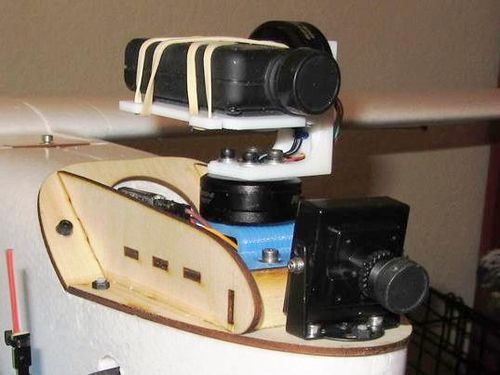
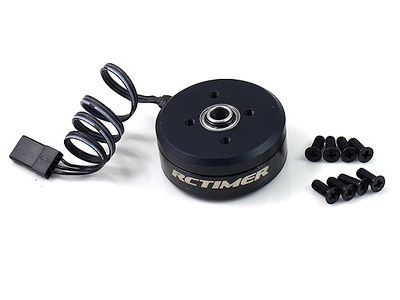
| − | Using concepts and pieces form my 3 axis gimbal, I put together a 2-axis | + | Using concepts and pieces form my 3 axis gimbal, I put together a 2-axis Mobius gimbal that works on Pan (yaw) and Tilt (pitch). For this I am using the same (15mm) gimbal motor from RCTimer with a hollow shaft to help with wire routing. The hollow shaft makes the routing easy without affecting the motion freedom. The motor wires are nice ultra-flexible silicone and you can fit up to three sets through the shaft opening.<br><br> |
{| class="FCK__ShowTableBorders" cellspacing="1" cellpadding="1" width="95%" border="0" | {| class="FCK__ShowTableBorders" cellspacing="1" cellpadding="1" width="95%" border="0" | ||
| Line 22: | Line 21: | ||
| align="center" width="50%" | RCTimer hollow shaft motor | | align="center" width="50%" | RCTimer hollow shaft motor | ||
|}<br><br> | |}<br><br> | ||
| − | |||
| − | |||
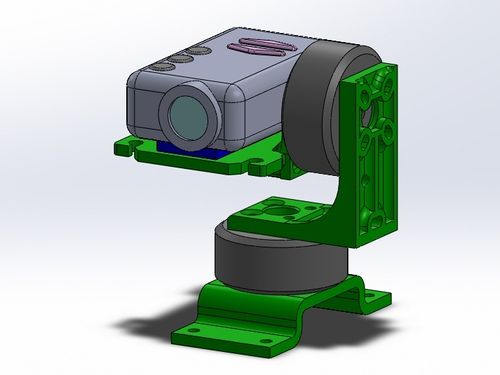
After a few iterations in SolidWorks, I printed a few different versions to zero-in on the balance and clearances. It balances perfectly with no added counterweight as long as you have the "C" lens and the PU Gel pad. Here is how it looks in SolidWorks:<br> | After a few iterations in SolidWorks, I printed a few different versions to zero-in on the balance and clearances. It balances perfectly with no added counterweight as long as you have the "C" lens and the PU Gel pad. Here is how it looks in SolidWorks:<br> | ||
| Line 33: | Line 30: | ||
| align="center" width="50%" | 3D Model (SolidWorks) | | align="center" width="50%" | 3D Model (SolidWorks) | ||
|}<br><br> | |}<br><br> | ||
| + | |||
| + | For the mounting I am again using an Align PU Gel pad for anti-slip and minor vibration isolation.<br><br> | ||
| + | |||
| + | === Dimensions === | ||
| + | |||
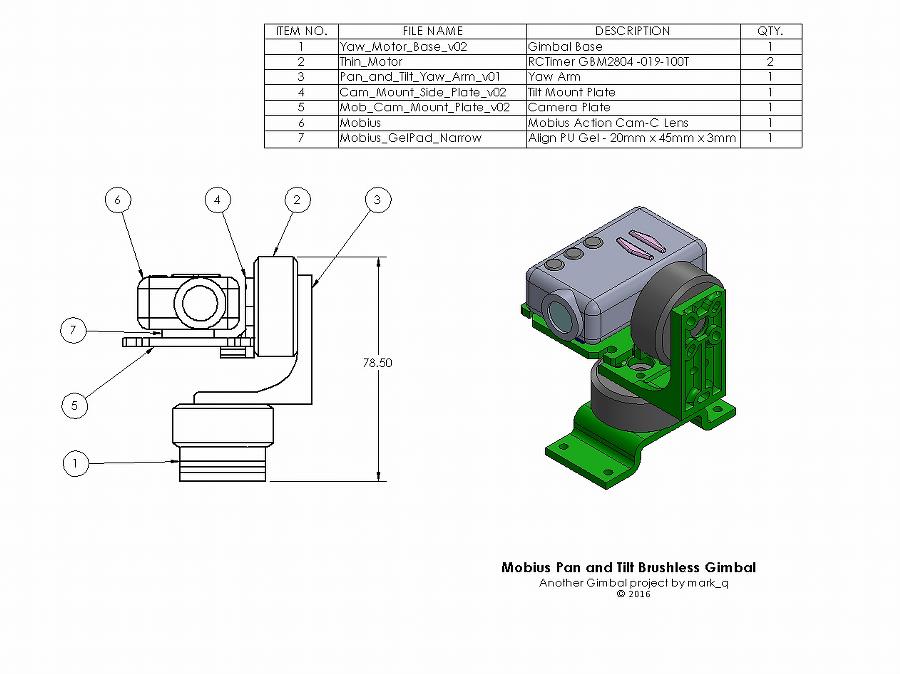
| + | Gimbal height is shown in the drawing image below. As far as rotational, here are the numbers "as-built":<br> | ||
| + | |||
| + | :*Pitch: +/- 50 Degrees | ||
| + | :*Yaw: +/- 160 Degrees | ||
| + | <br> | ||
| + | |||
| + | {| class="FCK__ShowTableBorders" cellspacing="1" cellpadding="1" width="95%" border="0" | ||
| + | |- | ||
| + | | align="center" width="70%" | [[Image:BGP100.jpg|900px]] | ||
| + | |- | ||
| + | | align="center" width="50%" | Envelope drawing | ||
| + | |}<br><br> | ||
| + | |||
| + | === Parts List === | ||
| + | |||
| + | Motors, Controller & Hardware<br> | ||
| + | :2 RCTimer GBM2804 hollow shaft gimbal motors | ||
| + | :Storm32 v1.1 or newer brushless gimbal controller | ||
| + | :12 M3x8 socket head cap screws | ||
| + | :12 M3 flat washers | ||
| + | :6 M3x6 flat head screws | ||
| + | :Align PJ Gel Pad | ||
| + | :Small wire ties<br><br> | ||
| + | |||
| + | 3D Prints<br> | ||
| + | :Camera Mount Plate - Mob_Mnt_Plate_v03 | ||
| + | :Camera Mount Motor Plate - Mob_End_Plate_v01 | ||
| + | :Gimbal Pitch Arm - Mob_G_E_Pitch_Brkt_v003 | ||
| + | :Gimbal Yaw Arm - Mob_G_E_Yaw_Brkt_v004 | ||
| + | :Base Motor Bracket - Yaw_Motor_Brkt_v001<br><br> | ||
| + | |||
| + | Tools needed<br> | ||
| + | :2.5mm ball end driver (allen wrench) | ||
| + | :Phillips head screwdriver | ||
| + | :3mm tap and tap drill | ||
| + | :Wire cutters<br><br> | ||
| + | |||
| + | Camera<br> | ||
| + | :Mobius with lens '2C'<br><br> | ||
| + | |||
| + | === Files === | ||
| + | |||
| + | Here are the print files if you would like to give this a try. The zip contains the 5 printable pieces and image files, simply richt-click the link and select "Save Target" for the download. If you would like the native SolidWorks files, please drop me a line (below) and I will accomodate.<br> | ||
| + | |||
| + | |||
| + | [http://www.itsqv.com/share/Mobius_Pan_and_Tilt_Gimbal.zip Mobius Pan & Tilt Gimbal.ZIP] | ||
| + | <br><br> | ||
| + | |||
| + | === Control Board === | ||
| + | |||
| + | I won't go into details here other than to say my favorite controller (also from RCG poster Noircogi!) is still the [http://www.readytoflyquads.com/storm32-bgc-3-axis-stm32-brushless-gimbal-controller Storm32] unit from ReadyToFlyQuads.com. These work better than any of the previous "Martinez" open source boards and I would highly recommend them.<br><br> | ||
| + | |||
| + | === Comments? Questions? === | ||
| + | |||
| + | :'''<u>[mailto:qmar80@hotmail.com?Subject=About%20the%202Axis%20Pan%20and%20Tilt%20Gimbal&body=Question? email me!]</u>''' | ||
| + | |||
| + | <br><br><br> | ||
| + | [[Category:Contents]] | ||
Latest revision as of 13:05, 21 April 2016

| |
| Pan & Tilt 2 axis gimbal |
Introduction
Using concepts and pieces form my 3 axis gimbal, I put together a 2-axis Mobius gimbal that works on Pan (yaw) and Tilt (pitch). For this I am using the same (15mm) gimbal motor from RCTimer with a hollow shaft to help with wire routing. The hollow shaft makes the routing easy without affecting the motion freedom. The motor wires are nice ultra-flexible silicone and you can fit up to three sets through the shaft opening.

|
| RCTimer hollow shaft motor |
After a few iterations in SolidWorks, I printed a few different versions to zero-in on the balance and clearances. It balances perfectly with no added counterweight as long as you have the "C" lens and the PU Gel pad. Here is how it looks in SolidWorks:

|
| 3D Model (SolidWorks) |
For the mounting I am again using an Align PU Gel pad for anti-slip and minor vibration isolation.
Dimensions
Gimbal height is shown in the drawing image below. As far as rotational, here are the numbers "as-built":
- Pitch: +/- 50 Degrees
- Yaw: +/- 160 Degrees

|
| Envelope drawing |
Parts List
Motors, Controller & Hardware
- 2 RCTimer GBM2804 hollow shaft gimbal motors
- Storm32 v1.1 or newer brushless gimbal controller
- 12 M3x8 socket head cap screws
- 12 M3 flat washers
- 6 M3x6 flat head screws
- Align PJ Gel Pad
- Small wire ties
3D Prints
- Camera Mount Plate - Mob_Mnt_Plate_v03
- Camera Mount Motor Plate - Mob_End_Plate_v01
- Gimbal Pitch Arm - Mob_G_E_Pitch_Brkt_v003
- Gimbal Yaw Arm - Mob_G_E_Yaw_Brkt_v004
- Base Motor Bracket - Yaw_Motor_Brkt_v001
Tools needed
- 2.5mm ball end driver (allen wrench)
- Phillips head screwdriver
- 3mm tap and tap drill
- Wire cutters
Camera
- Mobius with lens '2C'
Files
Here are the print files if you would like to give this a try. The zip contains the 5 printable pieces and image files, simply richt-click the link and select "Save Target" for the download. If you would like the native SolidWorks files, please drop me a line (below) and I will accomodate.
Control Board
I won't go into details here other than to say my favorite controller (also from RCG poster Noircogi!) is still the Storm32 unit from ReadyToFlyQuads.com. These work better than any of the previous "Martinez" open source boards and I would highly recommend them.
Comments? Questions?